<?xml version="1.0" encoding="utf-8"?><feed xmlns="http://www.w3.org/2005/Atom" ><generator uri="https://jekyllrb.com/" version="3.10.0">Jekyll</generator><link href="http://torch.vision/feed.xml" rel="self" type="application/atom+xml" /><link href="http://torch.vision/" rel="alternate" type="text/html" /><updated>2026-04-02T23:04:21+09:00</updated><id>http://torch.vision/feed.xml</id><title type="html">Lab of ryul99</title><subtitle>Lab for doing what ryul99 wants
</subtitle><author><name>Changmin Choi</name><email>cmchoi9901@gmail.com</email></author><entry><title type="html">Claude Code Hook으로 영어 공부하기</title><link href="http://torch.vision/posts/claude-english-lecturer-hook" rel="alternate" type="text/html" title="Claude Code Hook으로 영어 공부하기" /><published>2026-01-31T00:00:00+09:00</published><updated>2026-01-31T00:00:00+09:00</updated><id>http://torch.vision/posts/claude-english-lecturer-hook</id><content type="html" xml:base="http://torch.vision/posts/claude-english-lecturer-hook"><![CDATA[<h2 id="배경-설명">배경 설명</h2>

<p>평소에 영어로 프롬프트를 작성하면 모델이 더 좋은 성능을 보일 것이라고 생각하였고 겸사겸사 영어에 더 익숙해지기 위해서 되도록 Claude Code, Codex 등을 사용할 때는 영어로 prompt를 작성하였습니다.
그러나 이 경우에 부족한 영어 실력 때문에 의미나 뉘앙스가 잘못 전달되는 경우가 종종 있었습니다.</p>

<p>처음에는 prompt rewriter를 만들어서 기존 프롬프트를 자동으로 교정된 버전으로 대체하는 hook을 만들려고 했습니다. 하지만 Claude Code의 hook 시스템은 기존 프롬프트를 수정하는 것이 아니라 추가적인 프롬프트만 제공할 수 있었습니다.
또한 추가적인 프롬프트 제공도 완벽하지 않다는 이슈들이 있어 실제로 적용하는 데 어려움이 있었습니다. <a href="https://github.com/anthropics/claude-code/issues/12151">issue link</a></p>

<p>그러다 <a href="https://jiun.dev/posts/claude-hooks-english-study/">jiun.dev의 글</a>에서 영어 공부용으로 hook을 활용하는 아이디어를 얻었고, 이를 참고해서 영어 공부용으로 수정해보기로 했습니다.</p>

<h2 id="구현">구현</h2>

<p>저는 모델 성능 저하를 최소화하고 싶었기 때문에 메인 프롬프트에 context가 주입되지 않는 것이 이상적이었습니다. 이를 위하여 2가지 방법을 사용하였습니다.</p>

<ul>
  <li>메인 Claude Code 프로세스에서 영어 공부 프롬프트를 처리하지 않고 별도의 Claude Code 서브 프로세스에서 non-interactive모드와 structured output을 사용하여 처리하도록 하였습니다.</li>
  <li>hook의 output으로 systemMessage를 사용하여 유저에게만 메시지가 보일 수 있도록 하였습니다. (<a href="https://code.claude.com/docs/en/hooks#json-output">관련 claude code 문서</a>)</li>
</ul>

<p>이때 별도의 Claude Code 프로세스를 non-interactive 모드로 실행하더라도 hook이 주입되기 때문에 <code class="language-plaintext highlighter-rouge">disableAllHooks</code> 옵션을 통해 hook을 비활성화 하여 해결하였습니다.</p>

<table>
  <tbody>
    <tr>
      <td><img src="/assets/images/claude-english-lecturer-hook/korean_example.png" alt="Korean example" /></td>
      <td><img src="/assets/images/claude-english-lecturer-hook/english_example.png" alt="English example" /></td>
    </tr>
  </tbody>
</table>

<h2 id="설정-방법">설정 방법</h2>

<h3 id="1-스크립트-설치">1. 스크립트 설치</h3>

<p>아래 스크립트를 <code class="language-plaintext highlighter-rouge">~/.claude/english-lecturer.sh</code>로 저장합니다. ( 제 <a href="https://github.com/ryul99/.dotfiles/blob/master/home/claude/english-lecturer.sh">dotfiles 레포</a>에서도 확인가능합니다 )</p>

<div class="language-bash highlighter-rouge"><div class="highlight"><pre class="highlight"><code><span class="c">#!/bin/bash</span>
<span class="c"># acknowledge: https://github.com/crescent-stdio for prompt</span>

<span class="nv">INPUT_PROMPT</span><span class="o">=</span><span class="s2">"</span><span class="si">$(</span><span class="nb">cat</span> | jq <span class="s1">'.prompt'</span><span class="si">)</span><span class="s2">"</span>
<span class="nv">TARGET_LANGUAGE</span><span class="o">=</span><span class="s2">"Korean"</span>

<span class="nv">JSON_SCHEMA</span><span class="o">=</span><span class="s1">'
{
    "type": "object",
    "properties": {
        "enhanced_prompt": {
            "type": "string",
            "description": "The improved prompt preserving original meaning"
        },
        "has_corrections": {
            "type": "boolean",
            "description": "Whether the original prompt had any issues to improve"
        },
        "corrections": {
            "type": "array",
            "items": {
                "type": "object",
                "properties": {
                    "original": { "type": "string" },
                    "suggestion": { "type": "string" },
                    "category": {
                        "type": "string",
                        "enum": ["grammar", "vocabulary", "style", "spelling", "word_order"]
                    },
                    "explanation": { "type": "string" }
                },
                "required": ["original", "suggestion", "category", "explanation"]
            },
            "description": "Gentle improvement suggestions, max 3 items"
        },
        "tip": {
            "type": "string",
            "description": "One concise learning tip"
        }
    },
    "required": ["enhanced_prompt", "has_corrections", "corrections", "tip"]
}
'</span>

<span class="nv">INPUT_PROMPT</span><span class="o">=</span><span class="s2">"</span><span class="se">\</span><span class="s2">
You are a supportive, encouraging English coach for a </span><span class="nv">$TARGET_LANGUAGE</span><span class="s2"> developer. Analyze the prompt below and return structured JSON.

Rules:
1. enhanced_prompt: Rewrite to be clear, natural, professional English. Preserve the original intent exactly. If the prompt is code-only or already perfect English, return it unchanged.
2. has_corrections: true if you made any meaningful improvements, false if the prompt was already correct or is pure code/commands.
3. corrections: List up to 3 gentle improvement suggestions. Each must have:
   - original: the phrase from the original prompt
   - suggestion: the improved phrase
   - category: one of grammar, vocabulary, style, spelling, word_order
   - explanation: brief explanation in </span><span class="nv">$TARGET_LANGUAGE</span><span class="s2"> (1 sentence, max 20 words).
4. tip: One memorable tip in </span><span class="nv">$TARGET_LANGUAGE</span><span class="s2"> (1 sentence, max 30 words) about the most useful pattern. If no corrections, share a useful English expression tip.

Focus on patterns </span><span class="nv">$TARGET_LANGUAGE</span><span class="s2"> speakers commonly struggle with: articles (a/the), prepositions, singular/plural, tense consistency, word order.

&lt;PROMPT&gt;
</span><span class="nv">$INPUT_PROMPT</span><span class="s2">
&lt;/PROMPT&gt;</span><span class="se">\</span><span class="s2">
"</span>

hook_output<span class="o">()</span> <span class="o">{</span>
    <span class="nb">printf</span> <span class="s1">'%s'</span> <span class="s2">"</span><span class="nv">$1</span><span class="s2">"</span> | jq <span class="nt">-Rs</span> <span class="s1">'{ suppressOutput: false, systemMessage: . }'</span>
<span class="o">}</span>

<span class="nv">RESPONSE</span><span class="o">=</span><span class="s2">"</span><span class="si">$(</span> <span class="se">\</span>
    <span class="nv">CLAUDE_CODE_EFFORT_LEVEL</span><span class="o">=</span>low <span class="nv">MAX_THINKING_TOKENS</span><span class="o">=</span>2000 <span class="se">\</span>
    <span class="nv">CLAUDE_CODE_DISABLE_AUTO_MEMORY</span><span class="o">=</span>1 <span class="se">\</span>
    <span class="nv">CLAUDE_CODE_SIMPLE</span><span class="o">=</span>0 <span class="se">\</span>
    claude <span class="se">\</span>
    <span class="nt">--tools</span><span class="o">=</span><span class="s1">''</span> <span class="se">\</span>
    <span class="nt">--strict-mcp-config</span> <span class="se">\</span>
    <span class="nt">--no-session-persistence</span> <span class="se">\</span>
    <span class="nt">--model</span> sonnet <span class="se">\</span>
    <span class="nt">--settings</span> <span class="s1">'{ "disableAllHooks": true }'</span> <span class="se">\</span>
    <span class="nt">--output-format</span> json <span class="se">\</span>
    <span class="nt">--json-schema</span> <span class="s2">"</span><span class="nv">$JSON_SCHEMA</span><span class="s2">"</span> <span class="se">\</span>
    <span class="nt">-p</span> <span class="s2">"</span><span class="nv">$INPUT_PROMPT</span><span class="s2">"</span>
<span class="si">)</span><span class="s2">"</span>

<span class="nv">STRUCTURED_OUTPUT</span><span class="o">=</span><span class="s2">"</span><span class="si">$(</span><span class="nb">echo</span> <span class="s2">"</span><span class="nv">$RESPONSE</span><span class="s2">"</span> | jq <span class="nt">-r</span> <span class="s1">'.structured_output'</span><span class="si">)</span><span class="s2">"</span>

<span class="k">if</span> <span class="o">[[</span> <span class="nt">-z</span> <span class="s2">"</span><span class="nv">$STRUCTURED_OUTPUT</span><span class="s2">"</span> <span class="o">||</span> <span class="s2">"</span><span class="nv">$STRUCTURED_OUTPUT</span><span class="s2">"</span> <span class="o">==</span> <span class="s2">"null"</span> <span class="o">]]</span><span class="p">;</span> <span class="k">then
    </span><span class="nv">ERROR_DETAIL</span><span class="o">=</span><span class="s2">"</span><span class="si">$(</span><span class="nb">echo</span> <span class="s2">"</span><span class="nv">$RESPONSE</span><span class="s2">"</span> | jq <span class="nt">-r</span> <span class="s1">'.result // "unknown error"'</span><span class="si">)</span><span class="s2">"</span>
    hook_output <span class="s2">"Failed to generate lesson: </span><span class="nv">$ERROR_DETAIL</span><span class="s2">"</span>
    <span class="nb">exit </span>0
<span class="k">fi

</span><span class="nv">ENHANCED</span><span class="o">=</span><span class="s2">"</span><span class="si">$(</span><span class="nb">echo</span> <span class="s2">"</span><span class="nv">$STRUCTURED_OUTPUT</span><span class="s2">"</span> | jq <span class="nt">-r</span> <span class="s1">'.enhanced_prompt'</span><span class="si">)</span><span class="s2">"</span>
<span class="nv">CORRECTIONS_DISPLAY</span><span class="o">=</span><span class="s2">""</span>
<span class="nv">TIP</span><span class="o">=</span><span class="s2">"</span><span class="si">$(</span><span class="nb">echo</span> <span class="s2">"</span><span class="nv">$STRUCTURED_OUTPUT</span><span class="s2">"</span> | jq <span class="nt">-r</span> <span class="s1">'.tip'</span><span class="si">)</span><span class="s2">"</span>

<span class="nv">HAS_CORRECTIONS</span><span class="o">=</span><span class="s2">"</span><span class="si">$(</span><span class="nb">echo</span> <span class="s2">"</span><span class="nv">$STRUCTURED_OUTPUT</span><span class="s2">"</span> | jq <span class="nt">-r</span> <span class="s1">'.has_corrections'</span><span class="si">)</span><span class="s2">"</span>
<span class="k">if</span> <span class="o">[[</span> <span class="s2">"</span><span class="nv">$HAS_CORRECTIONS</span><span class="s2">"</span> <span class="o">==</span> <span class="s2">"true"</span> <span class="o">]]</span><span class="p">;</span> <span class="k">then
    </span><span class="nv">CORRECTIONS_DISPLAY</span><span class="o">=</span><span class="s2">"</span><span class="si">$(</span><span class="nb">echo</span> <span class="s2">"</span><span class="nv">$STRUCTURED_OUTPUT</span><span class="s2">"</span> | jq <span class="nt">-r</span> <span class="s1">'
        .corrections[] |
        "- ✅ \(.category): \(.original) → \(.suggestion)\n  - \(.explanation)\n"
    '</span><span class="si">)</span><span class="s2">"</span>
<span class="k">fi

</span>hook_output <span class="s2">"</span><span class="nv">$ENHANCED</span><span class="s2">
</span><span class="nv">$CORRECTIONS_DISPLAY</span><span class="s2">
✨ </span><span class="nv">$TIP</span><span class="s2">"</span>

<span class="nb">exit </span>0
</code></pre></div></div>

<h3 id="2-설정-파일-수정">2. 설정 파일 수정</h3>

<p><code class="language-plaintext highlighter-rouge">~/.claude/settings.json</code>에 다음 내용을 추가합니다.</p>

<div class="language-json highlighter-rouge"><div class="highlight"><pre class="highlight"><code><span class="p">{</span><span class="w">
  </span><span class="nl">"hooks"</span><span class="p">:</span><span class="w"> </span><span class="p">{</span><span class="w">
    </span><span class="nl">"UserPromptSubmit"</span><span class="p">:</span><span class="w"> </span><span class="p">[</span><span class="w">
      </span><span class="p">{</span><span class="w">
        </span><span class="nl">"hooks"</span><span class="p">:</span><span class="w"> </span><span class="p">[</span><span class="w">
          </span><span class="p">{</span><span class="w">
            </span><span class="nl">"type"</span><span class="p">:</span><span class="w"> </span><span class="s2">"command"</span><span class="p">,</span><span class="w">
            </span><span class="nl">"command"</span><span class="p">:</span><span class="w"> </span><span class="s2">"~/.claude/english-lecturer.sh"</span><span class="w">
          </span><span class="p">}</span><span class="w">
        </span><span class="p">]</span><span class="w">
      </span><span class="p">}</span><span class="w">
    </span><span class="p">]</span><span class="w">
  </span><span class="p">}</span><span class="w">
</span><span class="p">}</span><span class="w">
</span></code></pre></div></div>

<p>혹은 아래 명령어를 실행합니다.</p>

<div class="language-bash highlighter-rouge"><div class="highlight"><pre class="highlight"><code>jq <span class="s1">'.hooks.UserPromptSubmit = ((.hooks.UserPromptSubmit // []) + [{"hooks": [{"type": "command", "command": "~/.claude/english-lecturer.sh"}]}])'</span> ~/.claude/settings.json <span class="o">&gt;</span> /tmp/settings.json <span class="o">&amp;&amp;</span> <span class="nb">mv</span> /tmp/settings.json ~/.claude/settings.json
</code></pre></div></div>

<h3 id="3-커스터마이징">3. 커스터마이징</h3>

<p>스크립트 내의 다음 변수들을 수정해서 동작을 변경할 수 있습니다.</p>

<ul>
  <li><code class="language-plaintext highlighter-rouge">TARGET_LANGUAGE</code>: 문법 설명의 언어 (기본값: “Korean”)</li>
  <li><code class="language-plaintext highlighter-rouge">JSON_SCHEMA</code>: Claude로부터 받을 응답의 구조 (프롬프트를 크게 변경하지 않는다면 수정이 필요하지 않습니다)</li>
  <li>사용 모델 (기본값: “sonnet” / haiku의 경우 빠르긴 하나 성능이 떨어졌습니다)</li>
</ul>

<p>이제 프롬프트를 제출할 때마다 자동으로 교정된 버전과 짧은 문법 설명을 받을 수 있습니다.</p>

<h3 id="appendix-change-log">Appendix: change log</h3>

<ul>
  <li>2026/03/30: 에러메시지 표시 수정, <code class="language-plaintext highlighter-rouge">CLAUDE_CODE_SIMPLE=0</code> 적용 (Claude Code 업데이트로 해당 옵션 사용시 OAuth 스킵하게 변경됨)</li>
  <li>2026/03/11: <code class="language-plaintext highlighter-rouge">CLAUDE_CODE_EFFORT_LEVEL=low</code>, <code class="language-plaintext highlighter-rouge">CLAUDE_CODE_SIMPLE=1</code> 적용</li>
  <li>2026/03/01: json 파싱 개선</li>
  <li>2026/02/22: LOCK 환경변수 대신 <code class="language-plaintext highlighter-rouge">disableAllHooks</code> 사용 / <code class="language-plaintext highlighter-rouge">MAX_THINKING_TOKENS</code> 을 제한</li>
  <li>2026/02/06: Claude Code에 추가된 systemMessage 기능 사용-history toggle 없이 표시, <code class="language-plaintext highlighter-rouge">--no-session-persistence</code> 옵션 추가</li>
  <li>2026/02/02: 프롬프트 개선</li>
  <li>2026/01/31: 포스트 첫 작성</li>
</ul>]]></content><author><name>Changmin Choi</name><email>cmchoi9901@gmail.com</email></author><category term="ai" /><category term="tool" /><category term="claude" /><summary type="html"><![CDATA[배경 설명 평소에 영어로 프롬프트를 작성하면 모델이 더 좋은 성능을 보일 것이라고 생각하였고 겸사겸사 영어에 더 익숙해지기 위해서 되도록 Claude Code, Codex 등을 사용할 때는 영어로 prompt를 작성하였습니다. 그러나 이 경우에 부족한 영어 실력 때문에 의미나 뉘앙스가 잘못 전달되는 경우가 종종 있었습니다. 처음에는 prompt rewriter를 만들어서 기존 프롬프트를 자동으로 교정된 버전으로 대체하는 hook을 만들려고 했습니다. 하지만 Claude Code의 hook 시스템은 기존 프롬프트를 수정하는 것이 아니라 추가적인 프롬프트만 제공할 수 있었습니다. 또한 추가적인 프롬프트 제공도 완벽하지 않다는 이슈들이 있어 실제로 적용하는 데 어려움이 있었습니다. issue link 그러다 jiun.dev의 글에서 영어 공부용으로 hook을 활용하는 아이디어를 얻었고, 이를 참고해서 영어 공부용으로 수정해보기로 했습니다. 구현 저는 모델 성능 저하를 최소화하고 싶었기 때문에 메인 프롬프트에 context가 주입되지 않는 것이 이상적이었습니다. 이를 위하여 2가지 방법을 사용하였습니다. 메인 Claude Code 프로세스에서 영어 공부 프롬프트를 처리하지 않고 별도의 Claude Code 서브 프로세스에서 non-interactive모드와 structured output을 사용하여 처리하도록 하였습니다. hook의 output으로 systemMessage를 사용하여 유저에게만 메시지가 보일 수 있도록 하였습니다. (관련 claude code 문서) 이때 별도의 Claude Code 프로세스를 non-interactive 모드로 실행하더라도 hook이 주입되기 때문에 disableAllHooks 옵션을 통해 hook을 비활성화 하여 해결하였습니다. 설정 방법 1. 스크립트 설치 아래 스크립트를 ~/.claude/english-lecturer.sh로 저장합니다. ( 제 dotfiles 레포에서도 확인가능합니다 ) #!/bin/bash # acknowledge: https://github.com/crescent-stdio for prompt INPUT_PROMPT="$(cat | jq '.prompt')" TARGET_LANGUAGE="Korean" JSON_SCHEMA=' { "type": "object", "properties": { "enhanced_prompt": { "type": "string", "description": "The improved prompt preserving original meaning" }, "has_corrections": { "type": "boolean", "description": "Whether the original prompt had any issues to improve" }, "corrections": { "type": "array", "items": { "type": "object", "properties": { "original": { "type": "string" }, "suggestion": { "type": "string" }, "category": { "type": "string", "enum": ["grammar", "vocabulary", "style", "spelling", "word_order"] }, "explanation": { "type": "string" } }, "required": ["original", "suggestion", "category", "explanation"] }, "description": "Gentle improvement suggestions, max 3 items" }, "tip": { "type": "string", "description": "One concise learning tip" } }, "required": ["enhanced_prompt", "has_corrections", "corrections", "tip"] } ' INPUT_PROMPT="\ You are a supportive, encouraging English coach for a $TARGET_LANGUAGE developer. Analyze the prompt below and return structured JSON. Rules: 1. enhanced_prompt: Rewrite to be clear, natural, professional English. Preserve the original intent exactly. If the prompt is code-only or already perfect English, return it unchanged. 2. has_corrections: true if you made any meaningful improvements, false if the prompt was already correct or is pure code/commands. 3. corrections: List up to 3 gentle improvement suggestions. Each must have: - original: the phrase from the original prompt - suggestion: the improved phrase - category: one of grammar, vocabulary, style, spelling, word_order - explanation: brief explanation in $TARGET_LANGUAGE (1 sentence, max 20 words). 4. tip: One memorable tip in $TARGET_LANGUAGE (1 sentence, max 30 words) about the most useful pattern. If no corrections, share a useful English expression tip. Focus on patterns $TARGET_LANGUAGE speakers commonly struggle with: articles (a/the), prepositions, singular/plural, tense consistency, word order. &lt;PROMPT&gt; $INPUT_PROMPT &lt;/PROMPT&gt;\ " hook_output() { printf '%s' "$1" | jq -Rs '{ suppressOutput: false, systemMessage: . }' } RESPONSE="$( \ CLAUDE_CODE_EFFORT_LEVEL=low MAX_THINKING_TOKENS=2000 \ CLAUDE_CODE_DISABLE_AUTO_MEMORY=1 \ CLAUDE_CODE_SIMPLE=0 \ claude \ --tools='' \ --strict-mcp-config \ --no-session-persistence \ --model sonnet \ --settings '{ "disableAllHooks": true }' \ --output-format json \ --json-schema "$JSON_SCHEMA" \ -p "$INPUT_PROMPT" )" STRUCTURED_OUTPUT="$(echo "$RESPONSE" | jq -r '.structured_output')" if [[ -z "$STRUCTURED_OUTPUT" || "$STRUCTURED_OUTPUT" == "null" ]]; then ERROR_DETAIL="$(echo "$RESPONSE" | jq -r '.result // "unknown error"')" hook_output "Failed to generate lesson: $ERROR_DETAIL" exit 0 fi ENHANCED="$(echo "$STRUCTURED_OUTPUT" | jq -r '.enhanced_prompt')" CORRECTIONS_DISPLAY="" TIP="$(echo "$STRUCTURED_OUTPUT" | jq -r '.tip')" HAS_CORRECTIONS="$(echo "$STRUCTURED_OUTPUT" | jq -r '.has_corrections')" if [[ "$HAS_CORRECTIONS" == "true" ]]; then CORRECTIONS_DISPLAY="$(echo "$STRUCTURED_OUTPUT" | jq -r ' .corrections[] | "- ✅ \(.category): \(.original) → \(.suggestion)\n - \(.explanation)\n" ')" fi hook_output "$ENHANCED $CORRECTIONS_DISPLAY ✨ $TIP" exit 0 2. 설정 파일 수정 ~/.claude/settings.json에 다음 내용을 추가합니다. { "hooks": { "UserPromptSubmit": [ { "hooks": [ { "type": "command", "command": "~/.claude/english-lecturer.sh" } ] } ] } } 혹은 아래 명령어를 실행합니다. jq '.hooks.UserPromptSubmit = ((.hooks.UserPromptSubmit // []) + [{"hooks": [{"type": "command", "command": "~/.claude/english-lecturer.sh"}]}])' ~/.claude/settings.json &gt; /tmp/settings.json &amp;&amp; mv /tmp/settings.json ~/.claude/settings.json 3. 커스터마이징 스크립트 내의 다음 변수들을 수정해서 동작을 변경할 수 있습니다. TARGET_LANGUAGE: 문법 설명의 언어 (기본값: “Korean”) JSON_SCHEMA: Claude로부터 받을 응답의 구조 (프롬프트를 크게 변경하지 않는다면 수정이 필요하지 않습니다) 사용 모델 (기본값: “sonnet” / haiku의 경우 빠르긴 하나 성능이 떨어졌습니다) 이제 프롬프트를 제출할 때마다 자동으로 교정된 버전과 짧은 문법 설명을 받을 수 있습니다. Appendix: change log 2026/03/30: 에러메시지 표시 수정, CLAUDE_CODE_SIMPLE=0 적용 (Claude Code 업데이트로 해당 옵션 사용시 OAuth 스킵하게 변경됨) 2026/03/11: CLAUDE_CODE_EFFORT_LEVEL=low, CLAUDE_CODE_SIMPLE=1 적용 2026/03/01: json 파싱 개선 2026/02/22: LOCK 환경변수 대신 disableAllHooks 사용 / MAX_THINKING_TOKENS 을 제한 2026/02/06: Claude Code에 추가된 systemMessage 기능 사용-history toggle 없이 표시, --no-session-persistence 옵션 추가 2026/02/02: 프롬프트 개선 2026/01/31: 포스트 첫 작성]]></summary><media:thumbnail xmlns:media="http://search.yahoo.com/mrss/" url="http://torch.vision/assets/images/profile.png" /><media:content medium="image" url="http://torch.vision/assets/images/profile.png" xmlns:media="http://search.yahoo.com/mrss/" /></entry><entry><title type="html">WSL2를 항상 켜져있는 서버로 사용하기</title><link href="http://torch.vision/posts/wsl-persistent" rel="alternate" type="text/html" title="WSL2를 항상 켜져있는 서버로 사용하기" /><published>2025-05-09T00:00:00+09:00</published><updated>2025-05-09T00:00:00+09:00</updated><id>http://torch.vision/posts/wsl-persistent</id><content type="html" xml:base="http://torch.vision/posts/wsl-persistent"><![CDATA[<h2 id="배경-설명">배경 설명</h2>

<p>WSL2는 윈도우에서 Linux를 쉽게 사용할 수 있는 방법중에 하나입니다. 그런데 WSL2를 서버처럼 사용하기에는 터미널 등에서 켜두지 않으면 자동으로 꺼지는 것이 걸림돌로 작용합니다. 이번 글에서는 이를 해결할 수 있는 방법을 소개합니다.</p>

<h2 id="1-부팅-시-자동으로-켜기">1. 부팅 시 자동으로 켜기</h2>

<p>ref: <a href="https://askubuntu.com/a/1178910">StackExchange</a></p>

<ol>
  <li>윈도우키 + R 를 눌러 <code class="language-plaintext highlighter-rouge">shell:startup</code>을 입력하여 시작 프로그램 폴더를 엽니다.
    <ul>
      <li>혹은 <code class="language-plaintext highlighter-rouge">C:\Users\&lt;사용자이름&gt;\AppData\Roaming\Microsoft\Windows\Start Menu\Programs\Startup</code> 경로로 이동합니다.</li>
    </ul>
  </li>
  <li><code class="language-plaintext highlighter-rouge">wsl.vbe</code>라는 이름의 배치 파일을 만들고 다음 내용을 추가합니다.</li>
</ol>

<div class="language-plaintext highlighter-rouge"><div class="highlight"><pre class="highlight"><code>Set ws = CreateObject("WScript.Shell")
ws.run "wsl -d &lt;배포판 이름&gt; --cd ~", 0, False
</code></pre></div></div>

<h2 id="2-계속-켜두기">2. 계속 켜두기</h2>

<p>먼저 WSL2에서 systemd 기능을 켜야 합니다. <a href="https://learn.microsoft.com/ko-kr/windows/wsl/systemd#how-to-enable-systemd">마소 공식 문서 참고</a></p>

<ol>
  <li>
    <p>vim, nano등을 사용하여 <code class="language-plaintext highlighter-rouge">/etc/wsl.conf</code>를 수정하여 다음 줄을 추가합니다.</p>

    <div class="language-plaintext highlighter-rouge"><div class="highlight"><pre class="highlight"><code>[boot]
systemd=true
</code></pre></div>    </div>
  </li>
  <li>
    <p>PowerShell에서 <code class="language-plaintext highlighter-rouge">wsl.exe --shutdown</code>을 하여 wsl을 끈 후 다시 wsl에 접속합니다.</p>
  </li>
</ol>

<p>실제 작업을 위해 systemd 서비스를 만들어줍니다.
원리는 wsl의 백그라운드에서 아무 일도 하지 않는 프로세스를 돌리는 것입니다. <a href="https://github.com/microsoft/WSL/issues/8854#issuecomment-1490454734">firejox 유저의 깃헙 코멘트 참고</a></p>

<ol>
  <li><code class="language-plaintext highlighter-rouge">/etc/systemd/system/wsl-alive.service</code>이라는 파일을 만들어 다음 내용을 추가합니다.
    <ul>
      <li>2025/05/09 수정: waitfor.exe가 사용하는 protocol이 24H2에서 deprecated 되어서 방법을 수정하였습니다. <a href="https://learn.microsoft.com/en-us/windows/whats-new/whats-new-windows-11-version-24h2#remote-mailslot-protocol-disabled-by-default">관련 링크</a></li>
    </ul>

    <div class="language-plaintext highlighter-rouge"><div class="highlight"><pre class="highlight"><code>[Unit]
Description=Keep Distro Alive

[Service]
ExecStart=/mnt/c/Windows/System32/WindowsPowerShell/v1.0/powershell.exe -WindowStyle Hidden -NonInteractive -NoProfile -Command "while ($true) { Start-Sleep -Seconds 3600 }"

[Install]
WantedBy=multi-user.target
</code></pre></div>    </div>
  </li>
  <li>
    <p><code class="language-plaintext highlighter-rouge">sudo systemctl daemon-reload</code>를 하여 서비스를 로드한 후 <code class="language-plaintext highlighter-rouge">sudo systemctl enable --now wsl-alive.service</code>를 하여 서비스를 켜줍니다.</p>
  </li>
  <li><code class="language-plaintext highlighter-rouge">sudo systemctl status wsl-alive.service</code>를 하여 제대로 켜져 있는 지 확인합니다.</li>
</ol>]]></content><author><name>Changmin Choi</name><email>cmchoi9901@gmail.com</email></author><category term="linux" /><category term="windows" /><category term="wsl" /><summary type="html"><![CDATA[배경 설명 WSL2는 윈도우에서 Linux를 쉽게 사용할 수 있는 방법중에 하나입니다. 그런데 WSL2를 서버처럼 사용하기에는 터미널 등에서 켜두지 않으면 자동으로 꺼지는 것이 걸림돌로 작용합니다. 이번 글에서는 이를 해결할 수 있는 방법을 소개합니다. 1. 부팅 시 자동으로 켜기 ref: StackExchange 윈도우키 + R 를 눌러 shell:startup을 입력하여 시작 프로그램 폴더를 엽니다. 혹은 C:\Users\&lt;사용자이름&gt;\AppData\Roaming\Microsoft\Windows\Start Menu\Programs\Startup 경로로 이동합니다. wsl.vbe라는 이름의 배치 파일을 만들고 다음 내용을 추가합니다. Set ws = CreateObject("WScript.Shell") ws.run "wsl -d &lt;배포판 이름&gt; --cd ~", 0, False 2. 계속 켜두기 먼저 WSL2에서 systemd 기능을 켜야 합니다. 마소 공식 문서 참고 vim, nano등을 사용하여 /etc/wsl.conf를 수정하여 다음 줄을 추가합니다. [boot] systemd=true PowerShell에서 wsl.exe --shutdown을 하여 wsl을 끈 후 다시 wsl에 접속합니다. 실제 작업을 위해 systemd 서비스를 만들어줍니다. 원리는 wsl의 백그라운드에서 아무 일도 하지 않는 프로세스를 돌리는 것입니다. firejox 유저의 깃헙 코멘트 참고 /etc/systemd/system/wsl-alive.service이라는 파일을 만들어 다음 내용을 추가합니다. 2025/05/09 수정: waitfor.exe가 사용하는 protocol이 24H2에서 deprecated 되어서 방법을 수정하였습니다. 관련 링크 [Unit] Description=Keep Distro Alive [Service] ExecStart=/mnt/c/Windows/System32/WindowsPowerShell/v1.0/powershell.exe -WindowStyle Hidden -NonInteractive -NoProfile -Command "while ($true) { Start-Sleep -Seconds 3600 }" [Install] WantedBy=multi-user.target sudo systemctl daemon-reload를 하여 서비스를 로드한 후 sudo systemctl enable --now wsl-alive.service를 하여 서비스를 켜줍니다. sudo systemctl status wsl-alive.service를 하여 제대로 켜져 있는 지 확인합니다.]]></summary><media:thumbnail xmlns:media="http://search.yahoo.com/mrss/" url="http://torch.vision/assets/images/profile.png" /><media:content medium="image" url="http://torch.vision/assets/images/profile.png" xmlns:media="http://search.yahoo.com/mrss/" /></entry><entry><title type="html">ddns 서버 자체 구축하기</title><link href="http://torch.vision/posts/ddclient" rel="alternate" type="text/html" title="ddns 서버 자체 구축하기" /><published>2023-04-28T00:00:00+09:00</published><updated>2023-04-28T00:00:00+09:00</updated><id>http://torch.vision/posts/ddclient</id><content type="html" xml:base="http://torch.vision/posts/ddclient"><![CDATA[<h2 id="사건의-시작">사건의 시작</h2>

<p>일반적으로 가정집에서 Public IP까지는 받을 수 있지만 이 친구는 Static하지는 않습니다. (물론..거의 IP가 바뀌진 않지만 아주 가끔 바뀌는 경우가 있습니다) 이를 해결하기 위해서 DDNS를 많이들 셋팅하시는데, 보통 no-ip를 가입해서 공유기에 셋팅하거나 iptime 공유기에서 제공하는 iptime 도메인을 쓰는 방법을 사용합니다. 또 no-ip는 30일마다 이메일로 기간 연장을 해야합니다.</p>

<p>저는 이 두가지 모두 마음에 들지 않아서 제 공유기 밑에 있는 개인 서버에서 DDNS를 구축하는 방법을 찾아봤는데, <a href="https://developers.cloudflare.com/dns/manage-dns-records/how-to/managing-dynamic-ip-addresses/">클라우드 플레어에서 제공하는 문서</a>에서 언급된 ddclient를 살펴봤고 괜찮아보여서 구축해봤습니다.</p>

<h2 id="과정">과정</h2>

<p>사실 크게 신경써야할 과정이 있지는 않습니다. <a href="https://github.com/ddclient/ddclient">https://github.com/ddclient/ddclient</a> 에 가서 직접 소스코드를 받아서 빌드하거나 패키지매니저로 install하면 됩니다. 꽤 많은 패키지매니저에서 제공되고 있어서 쉽게 설치할 수 있었습니다.</p>

<ol>
  <li>저같은 경우에 Debian을 사용하고 있어서 <code class="language-plaintext highlighter-rouge">sudo apt install ddclient</code> 를 해줬습니다.</li>
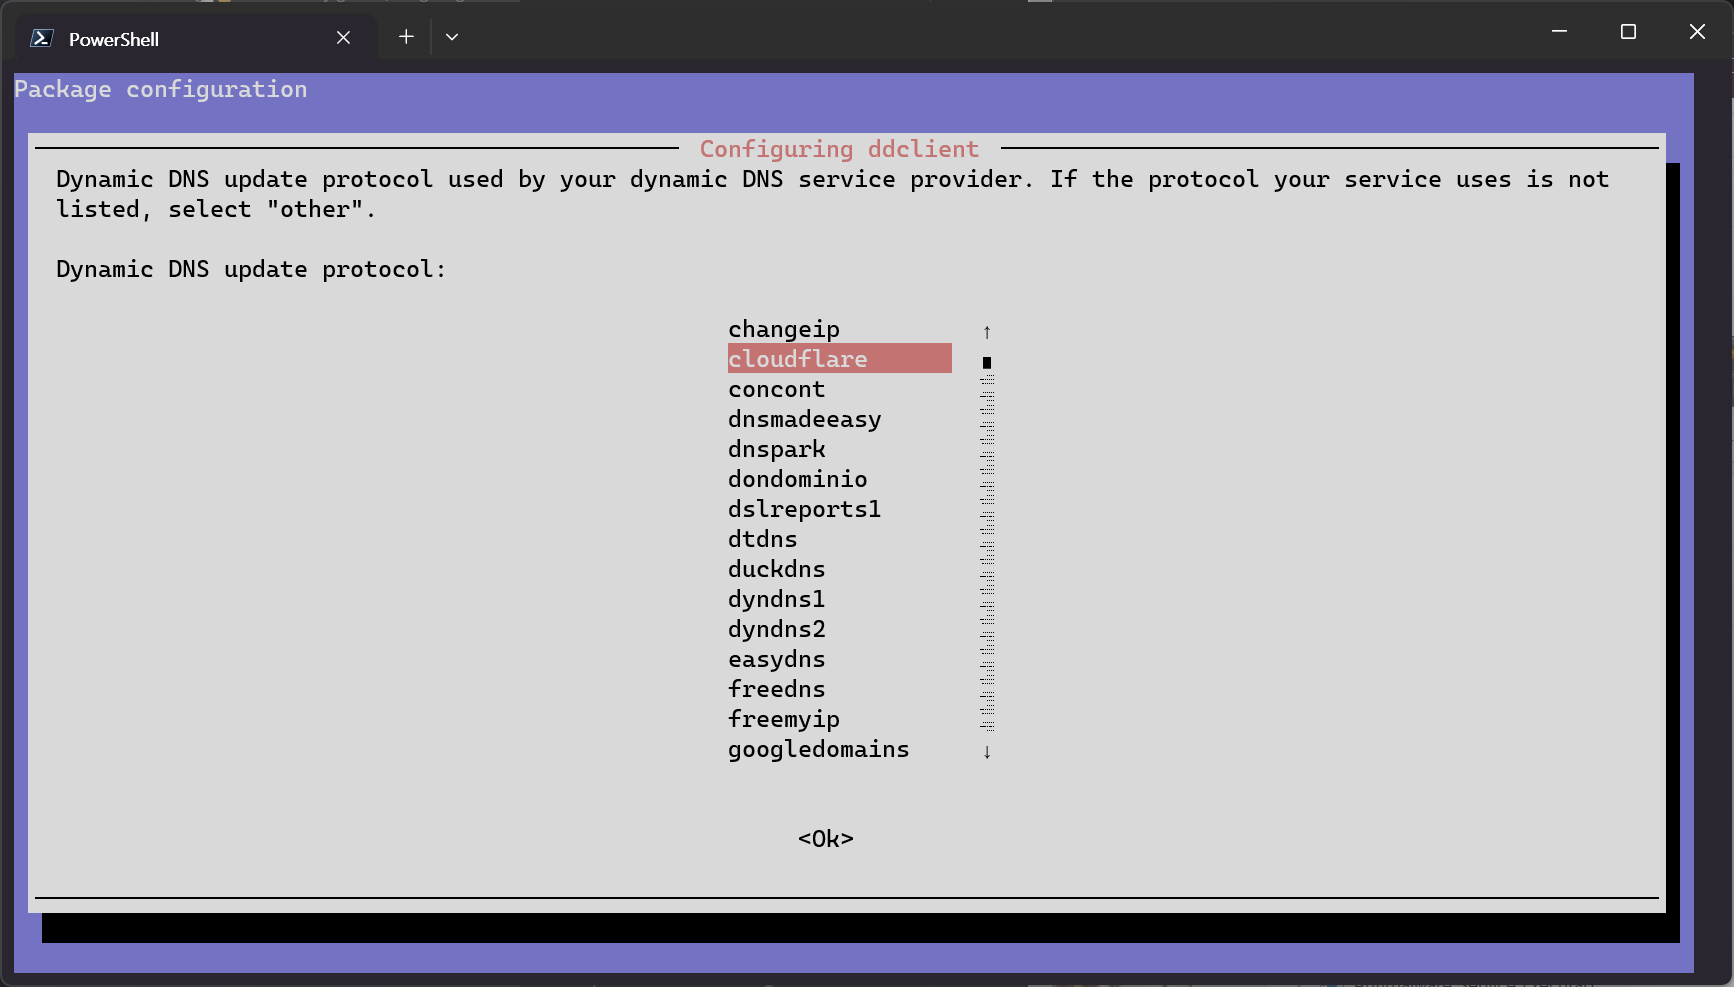
  <li>설치과정중에, config 셋팅하는 과정이 뜨는데, 이 과정에서 자신이 사용하고 있는 DNS provider를 골라서 (목록에서 보이지 않는다면 Others를 고르면 됩니다) 계정 identifier와 password 혹은 api키를 적어주면 됩니다.</li>
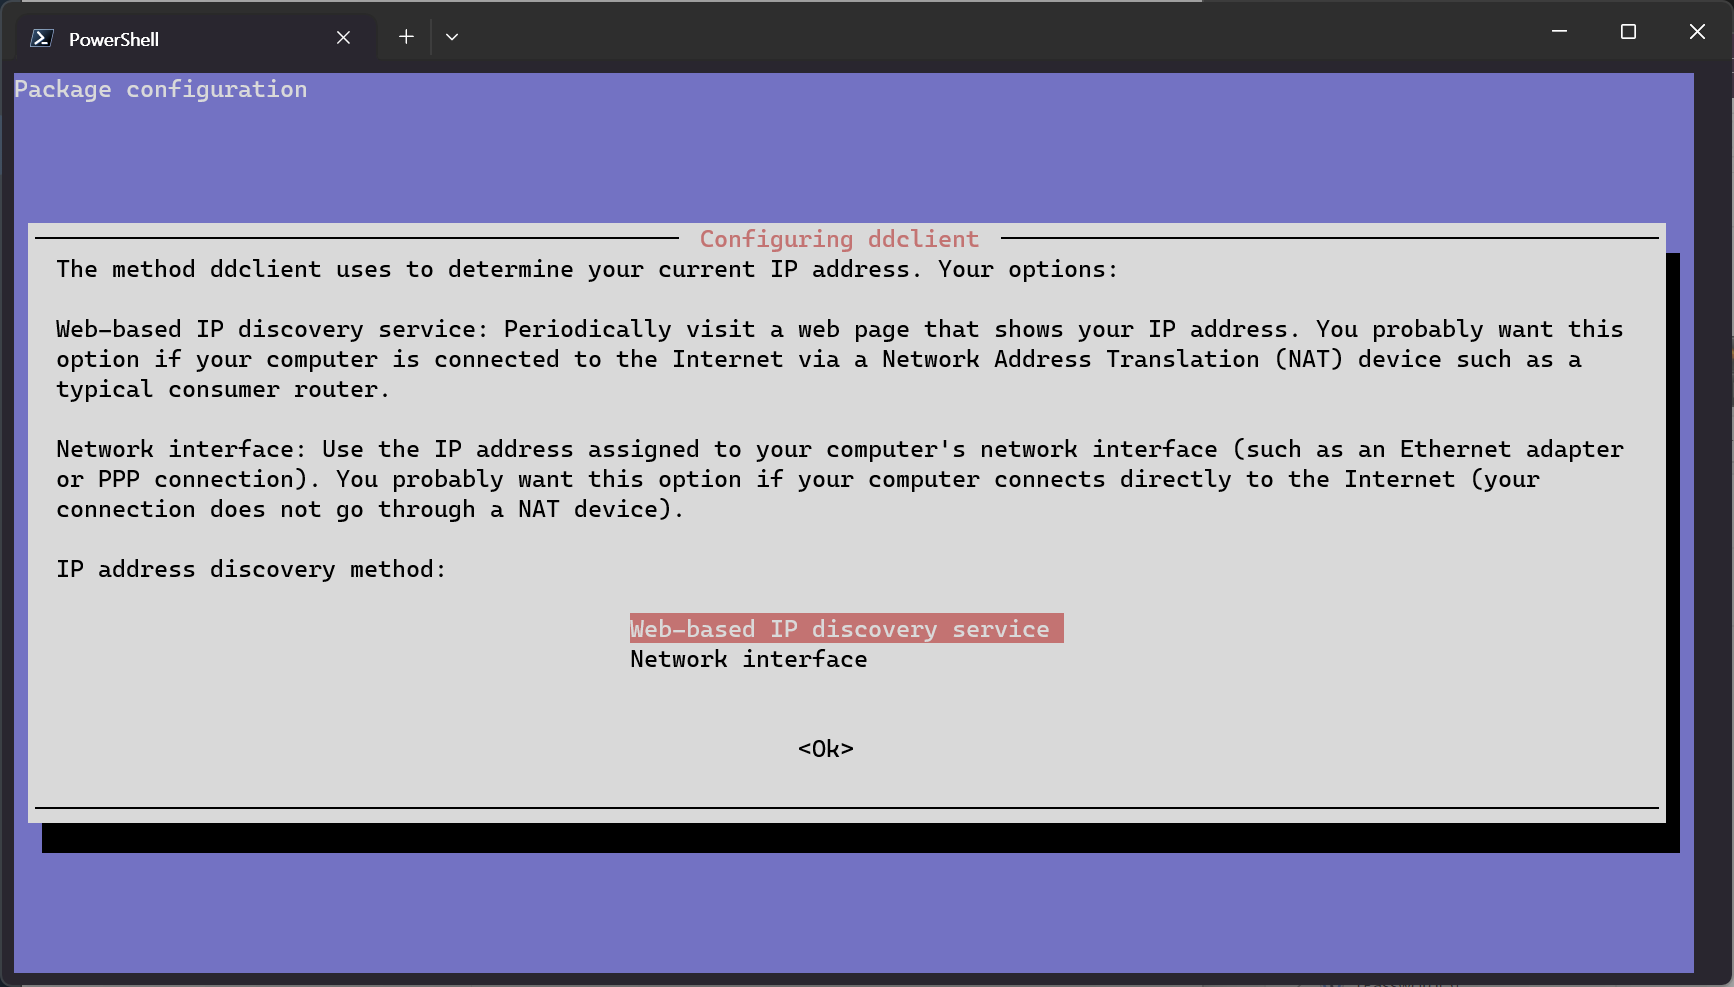
  <li>그다음은 본인의 IP를 어떻게 확인할 것인지를 선택해야 하는데, 저처럼 서버가 직접 Public IP를 가지는 것이 아니라 서버는 공유기 아래에서 Private IP를 가지고 있기 때문에 웹기반을 선택해주면 됩니다.</li>
  <li>여기까지 하면 설치는 끝나고 systemd service까지 켜져있는 상태일 겁니다. 여기서 <code class="language-plaintext highlighter-rouge">sudo systemctl status ddclient.service</code> 했을 때 warning 없이 잘 뜨면 문제가 없지만 저 같은 경우 config에서 <code class="language-plaintext highlighter-rouge">zone=</code> 부분이 빠져있어서 warning이 뜨고 있었습니다. (<a href="https://github.com/ddclient/ddclient/issues/375#issuecomment-1073393391">관련이슈</a>) 그래서 <code class="language-plaintext highlighter-rouge">/etc/ddclient.conf</code>를 직접 열어서 zone을 추가해주었습니다.</li>
  <li>마지막으로 재부팅되어도 자동으로 켜지도록 <code class="language-plaintext highlighter-rouge">sudo systemctl enable ddclient.service</code> 를 해주었습니다.</li>
</ol>

<table>
  <tbody>
    <tr>
      <td><img src="/assets/images/ddclient/fig1.png" alt="configuring provider" /></td>
      <td><img src="/assets/images/ddclient/fig2.png" alt="configuring IP discovery" /></td>
    </tr>
  </tbody>
</table>]]></content><author><name>Changmin Choi</name><email>cmchoi9901@gmail.com</email></author><category term="linux" /><summary type="html"><![CDATA[사건의 시작 일반적으로 가정집에서 Public IP까지는 받을 수 있지만 이 친구는 Static하지는 않습니다. (물론..거의 IP가 바뀌진 않지만 아주 가끔 바뀌는 경우가 있습니다) 이를 해결하기 위해서 DDNS를 많이들 셋팅하시는데, 보통 no-ip를 가입해서 공유기에 셋팅하거나 iptime 공유기에서 제공하는 iptime 도메인을 쓰는 방법을 사용합니다. 또 no-ip는 30일마다 이메일로 기간 연장을 해야합니다. 저는 이 두가지 모두 마음에 들지 않아서 제 공유기 밑에 있는 개인 서버에서 DDNS를 구축하는 방법을 찾아봤는데, 클라우드 플레어에서 제공하는 문서에서 언급된 ddclient를 살펴봤고 괜찮아보여서 구축해봤습니다. 과정 사실 크게 신경써야할 과정이 있지는 않습니다. https://github.com/ddclient/ddclient 에 가서 직접 소스코드를 받아서 빌드하거나 패키지매니저로 install하면 됩니다. 꽤 많은 패키지매니저에서 제공되고 있어서 쉽게 설치할 수 있었습니다. 저같은 경우에 Debian을 사용하고 있어서 sudo apt install ddclient 를 해줬습니다. 설치과정중에, config 셋팅하는 과정이 뜨는데, 이 과정에서 자신이 사용하고 있는 DNS provider를 골라서 (목록에서 보이지 않는다면 Others를 고르면 됩니다) 계정 identifier와 password 혹은 api키를 적어주면 됩니다. 그다음은 본인의 IP를 어떻게 확인할 것인지를 선택해야 하는데, 저처럼 서버가 직접 Public IP를 가지는 것이 아니라 서버는 공유기 아래에서 Private IP를 가지고 있기 때문에 웹기반을 선택해주면 됩니다. 여기까지 하면 설치는 끝나고 systemd service까지 켜져있는 상태일 겁니다. 여기서 sudo systemctl status ddclient.service 했을 때 warning 없이 잘 뜨면 문제가 없지만 저 같은 경우 config에서 zone= 부분이 빠져있어서 warning이 뜨고 있었습니다. (관련이슈) 그래서 /etc/ddclient.conf를 직접 열어서 zone을 추가해주었습니다. 마지막으로 재부팅되어도 자동으로 켜지도록 sudo systemctl enable ddclient.service 를 해주었습니다.]]></summary><media:thumbnail xmlns:media="http://search.yahoo.com/mrss/" url="http://torch.vision/assets/images/profile.png" /><media:content medium="image" url="http://torch.vision/assets/images/profile.png" xmlns:media="http://search.yahoo.com/mrss/" /></entry><entry><title type="html">coc.clangd가 vim에서 기본적인 부분에서 에러를 내뱉는 경우</title><link href="http://torch.vision/posts/vim-clangd" rel="alternate" type="text/html" title="coc.clangd가 vim에서 기본적인 부분에서 에러를 내뱉는 경우" /><published>2023-02-14T00:00:00+09:00</published><updated>2023-02-14T00:00:00+09:00</updated><id>http://torch.vision/posts/vim-clangd</id><content type="html" xml:base="http://torch.vision/posts/vim-clangd"><![CDATA[<h2 id="사건의-시작">사건의 시작</h2>

<p>vim에서 c, c++ 를 사용하기 위해서 coc.clangd를 셋팅했었습니다. 그런데 이 coc.langd가 <code class="language-plaintext highlighter-rouge">#include &lt;cstring&gt;</code>같은 기본적인 부분에서 에러를 내뱉길래 트러블슈팅을 시작했습니다.</p>

<h2 id="진행과정">진행과정</h2>

<ul>
  <li>처음에는 coc.clangd가 원래 c는 제대로 인식하는데 c++의 구문들을 이해하지 못한다고 생각해서 관련된 것들을 찾아봤습니다.</li>
  <li>그런데 coc.clangd가 c만 지원하는게 아니라 c++도 기본적으로 지원한다는 내용을 발견했습니다.</li>
  <li>이후 coc.clangd를 위한 패키지가 안 깔려있는 지, coc.clangd 재설치 등등 여러 과정을 거치다가 clangd가 c++를 이해하는 지 확인하기 위해서 이것저것 시도를 했습니다.</li>
  <li>그 과정에서 clang이 깔려 있지 않다는 것을 확인했고 clang을 깔고 얘를 통해 빌드를 시도하니 빔에서 본 똑같은 에러가 발생했습니다.</li>
  <li>이후 clang이 기본적인 헤더들을 못 찾는다는 <a href="https://stackoverflow.com/questions/26333823/clang-doesnt-see-basic-headers">스택오버플로우 글</a>을 발견했고 현재 상황과 딱 맞는 것을 확인했습니다.</li>
  <li>이 글에서 설명한대로 clang버전에 맞는 최신 g++-12를 설치하고 해결했습니다.</li>
</ul>

<h2 id="결론">결론</h2>

<ol>
  <li>clang 설치 (필요없을지도 모름)</li>
  <li>clang -v 해서 사용하고 있는 gcc버전들 확인</li>
  <li>그중에서 젤 높은 버전에 맞게 g++-12를 설치</li>
  <li>profit!</li>
</ol>

<p>g++이 이미 설치되어 있었기 때문에 문제가 없을 것이다 하고 넘어갈 뻔 했지만 g++-12를 설치하는 것을 시도하여 잘 해결했습니다.</p>

<h2 id="reference">Reference</h2>

<p>https://stackoverflow.com/a/29821538</p>]]></content><author><name>Changmin Choi</name><email>cmchoi9901@gmail.com</email></author><category term="vim" /><category term="c" /><category term="c++" /><category term="linux" /><category term="debugging" /><summary type="html"><![CDATA[사건의 시작 vim에서 c, c++ 를 사용하기 위해서 coc.clangd를 셋팅했었습니다. 그런데 이 coc.langd가 #include &lt;cstring&gt;같은 기본적인 부분에서 에러를 내뱉길래 트러블슈팅을 시작했습니다. 진행과정 처음에는 coc.clangd가 원래 c는 제대로 인식하는데 c++의 구문들을 이해하지 못한다고 생각해서 관련된 것들을 찾아봤습니다. 그런데 coc.clangd가 c만 지원하는게 아니라 c++도 기본적으로 지원한다는 내용을 발견했습니다. 이후 coc.clangd를 위한 패키지가 안 깔려있는 지, coc.clangd 재설치 등등 여러 과정을 거치다가 clangd가 c++를 이해하는 지 확인하기 위해서 이것저것 시도를 했습니다. 그 과정에서 clang이 깔려 있지 않다는 것을 확인했고 clang을 깔고 얘를 통해 빌드를 시도하니 빔에서 본 똑같은 에러가 발생했습니다. 이후 clang이 기본적인 헤더들을 못 찾는다는 스택오버플로우 글을 발견했고 현재 상황과 딱 맞는 것을 확인했습니다. 이 글에서 설명한대로 clang버전에 맞는 최신 g++-12를 설치하고 해결했습니다. 결론 clang 설치 (필요없을지도 모름) clang -v 해서 사용하고 있는 gcc버전들 확인 그중에서 젤 높은 버전에 맞게 g++-12를 설치 profit! g++이 이미 설치되어 있었기 때문에 문제가 없을 것이다 하고 넘어갈 뻔 했지만 g++-12를 설치하는 것을 시도하여 잘 해결했습니다. Reference https://stackoverflow.com/a/29821538]]></summary><media:thumbnail xmlns:media="http://search.yahoo.com/mrss/" url="http://torch.vision/assets/images/profile.png" /><media:content medium="image" url="http://torch.vision/assets/images/profile.png" xmlns:media="http://search.yahoo.com/mrss/" /></entry><entry><title type="html">ssh-agent forwarding 팁들</title><link href="http://torch.vision/posts/ssh-agent-forwarding-tips" rel="alternate" type="text/html" title="ssh-agent forwarding 팁들" /><published>2022-05-14T00:00:00+09:00</published><updated>2022-05-14T00:00:00+09:00</updated><id>http://torch.vision/posts/ssh-agent-forwarding-tips</id><content type="html" xml:base="http://torch.vision/posts/ssh-agent-forwarding-tips"><![CDATA[<h1 id="트러블슈팅">트러블슈팅</h1>

<p>깃헙에 푸시를 하는 등의 작업을 할 때 ssh key인증을 해야 합니다. 하지만 서버에서 주로 작업하는 경우 이러한 인증에 어려움이 있을 수 있고 어쩔 수 없이 서버에 key를 두고 작업하는 경우도 있습니다. 하지만 key는 공용 서버라면 서버에 두지 않는 편이 좋고 ssh-agent forwarding이라는 것을 사용하면 로컬에 있는 ssh key를 서버에서도 사용할 수 있습니다. 깃헙에서 이를 설명한 자세한 글이 <a href="https://docs.github.com/en/developers/overview/using-ssh-agent-forwarding">이 링크</a>에 있습니다. 이 글에서도 트러블 슈팅 방법에 대해서 설명하고 있지만 간략하게 정리해보려고 합니다.</p>

<p>조심해야할 점은, 말 그대로 로컬의 ssh-agent를 forwarding하는 것이기에, forwarding 이후에 ssh-agent를 다시 실행하면 안됩니다. 다시 실행한다면 기존의 ssh-agent를 가르키고 있던 <code class="language-plaintext highlighter-rouge">$SSH_AUTH_SOCK</code>을 덮어 써버려서 의미가 없어집니다.</p>

<p>이러한 일은 특히 multiple hop ssh agent forwaridng에서 쉽게 일어날 수 있는데, shell rc 에 ssh-agent를 실행하게 한 경우 특히 자주 일어납니다.</p>

<p>이를 막기위해서는 <code class="language-plaintext highlighter-rouge">$SSH_AUTH_SOCK</code>이 Set되어 있는 지 확인하고, Set 되어 있지 않으면 ssh-agent를 실행하는 방식으로 해결할 수 있습니다.</p>

<h2 id="과정">과정</h2>

<ol>
  <li>기본적으로 로컬과 서버 모두 ssh-agent가 켜져 있는 지 확인해야 합니다
    <ul>
      <li><code class="language-plaintext highlighter-rouge">echo $SSH_AUTH_SOCK</code> 에서 출력이 되는 지 아닌 지로 확인할 수 있습니다.</li>
    </ul>
  </li>
  <li>로컬에 <code class="language-plaintext highlighter-rouge">ssh-add -L</code>을 했을 때 공개키가 출력되어야 합니다.
    <ul>
      <li>만약 출력되지 않는다면 <code class="language-plaintext highlighter-rouge">ssh-add</code>를 입력하여 <code class="language-plaintext highlighter-rouge">~/.ssh</code>아래에 있는 키들을 자동으로 ssh-agent에 등록하거나 <code class="language-plaintext highlighter-rouge">ssh-add -K path/to/private_key</code>를 하여 다른 위치에 있는 private key를 ssh-agent와 키체인에 등록할 수 있습니다.</li>
    </ul>
  </li>
  <li>마지막 과정으로 서버에서 <code class="language-plaintext highlighter-rouge">ssh-add -L</code>을 했을 때 마찬가지로 공개키가 출력되어야 합니다.
    <ul>
      <li>여기서 공개키가 출력되지 않는다면 어딘가에서 문제가 있었기 때문이므로 1,2번 과정을 체크해보거나 앞서 언급한 <a href="https://docs.github.com/en/developers/overview/using-ssh-agent-forwarding">깃헙 링크</a>에서 트러블슈팅 파트를 읽어 보시는 걸 추천합니다.</li>
    </ul>
  </li>
</ol>

<h1 id="ssh-agent를-user-level-systemd-service로-만들기">ssh agent를 user-level systemd service로 만들기</h1>

<p>트러블슈팅 글에서도 알 수 있듯이 ssh-agent가 항상 켜져있어야 문제 없이 ssh-agent-forwarding이 잘 작동합니다. 때문에 systemd를 사용할 수 있는 환경이라면 user-level systemd service를 활용하여 재부팅/세션종료 후 재접속 하더라도 ssh-agent가 항상 켜져있을 수 있도록 도와주게 할 수 있습니다.</p>

<h2 id="과정-1">과정</h2>

<ol>
  <li><code class="language-plaintext highlighter-rouge">~/.config/systemd/user/ssh-agent.service</code>파일을 새로 만들면서 다음과 같이 설정합니다.</li>
</ol>

<div class="language-sh highlighter-rouge"><div class="highlight"><pre class="highlight"><code><span class="o">[</span>Unit]
<span class="nv">Description</span><span class="o">=</span>SSH key agent

<span class="o">[</span>Service]
<span class="nv">Type</span><span class="o">=</span>simple
<span class="nv">Environment</span><span class="o">=</span><span class="nv">SSH_AUTH_SOCK</span><span class="o">=</span>%t/ssh-agent.socket
<span class="nv">ExecStart</span><span class="o">=</span>/usr/bin/ssh-agent <span class="nt">-D</span> <span class="nt">-a</span> <span class="nv">$SSH_AUTH_SOCK</span>

<span class="o">[</span>Install]
<span class="nv">WantedBy</span><span class="o">=</span>default.target
</code></pre></div></div>

<ol>
  <li>
    <p><code class="language-plaintext highlighter-rouge">systemctl --user daemon-reload</code> 를 실행합니다.</p>
  </li>
  <li>
    <p><code class="language-plaintext highlighter-rouge">systemctl --user enable --now ssh-agent</code>를 실행합니다.</p>
  </li>
</ol>

<p>이렇게 하면 <code class="language-plaintext highlighter-rouge">${XDG_RUNTIME_DIR}/ssh-agent.socket</code>위치에 file의 형태로 <code class="language-plaintext highlighter-rouge">SSH_AUTH_SOCK</code>이 저장됩니다.</p>

<p>앞서 말한대로 SSH Agent Overwrite 이슈를 피하기 위해서는, shell rc (.bashrc / .zshrc 등…) 에 다음을 추가해주는 것이 좋습니다.</p>

<p>이 코드는 <code class="language-plaintext highlighter-rouge">SSH_AUTH_SOCK</code>이 설정되어 있지 않을 때 위에서 작업한 SSH Agent의 SOCK을 바라보도록 하는 코드입니다.</p>

<div class="language-sh highlighter-rouge"><div class="highlight"><pre class="highlight"><code><span class="k">if</span> <span class="o">!</span> <span class="nb">test</span> <span class="s2">"</span><span class="nv">$SSH_AUTH_SOCK</span><span class="s2">"</span> <span class="p">;</span> <span class="k">then
    </span><span class="nb">export </span><span class="nv">SSH_AUTH_SOCK</span><span class="o">=</span><span class="s2">"</span><span class="k">${</span><span class="nv">XDG_RUNTIME_DIR</span><span class="k">}</span><span class="s2">/ssh-agent.socket"</span>
<span class="k">fi</span>
</code></pre></div></div>

<h2 id="reference">Reference</h2>

<ul>
  <li>https://unix.stackexchange.com/a/390631</li>
  <li>https://unix.stackexchange.com/questions/528360/ssh-agent-forwarding-troubleshooting#comment977659_528360</li>
</ul>

<h1 id="tmux에서-ssh-agent-forwarding-사용하기">tmux에서 ssh agent forwarding 사용하기</h1>

<p>tmux에서 ssh agent forwarding이 잘 안되는 이유는, tmux가 ssh 세션보다 오래 살아있어서 <code class="language-plaintext highlighter-rouge">SSH_AUTH_SOCK</code> 변수를 이미 죽은 ssh 세션의 것으로 들고 있기 때문입니다. 이를 해결하기 위해서는 <code class="language-plaintext highlighter-rouge">SSH_AUTH_SOCK</code>이 가르키고 있는 temp 파일을 홈 디렉토리에 symlink하고, tmux에서는 그 파일을 보게 만들면 됩니다.</p>

<h2 id="과정-2">과정</h2>

<ul>
  <li><code class="language-plaintext highlighter-rouge">~/.ssh/rc</code>에 다음 코드를 추가해줍니다.</li>
</ul>

<div class="language-sh highlighter-rouge"><div class="highlight"><pre class="highlight"><code><span class="c"># Fix SSH auth socket location so agent forwarding works with tmux</span>
<span class="k">if </span><span class="nb">test</span> <span class="s2">"</span><span class="nv">$SSH_AUTH_SOCK</span><span class="s2">"</span> <span class="p">;</span> <span class="k">then
    </span><span class="nb">ln</span> <span class="nt">-sf</span> <span class="nv">$SSH_AUTH_SOCK</span> ~/.ssh/ssh_auth_sock
<span class="k">fi</span>
</code></pre></div></div>

<ul>
  <li>그리고 위에서 shell rc에 추가한 코드를 수정하여 다음과 같이 바꿉니다.
    <ul>
      <li>이 코드는 <code class="language-plaintext highlighter-rouge">~/.ssh/ssh_auth_sock</code>, <code class="language-plaintext highlighter-rouge">SSH_AUTH_SOCK</code>, <code class="language-plaintext highlighter-rouge">XDG_RUNTIME_DIR</code> 순서대로 값을 확인하고 <code class="language-plaintext highlighter-rouge">SSH_AUTH_SOCK</code>을 설정하는 코드입니다.</li>
    </ul>
  </li>
</ul>

<div class="language-sh highlighter-rouge"><div class="highlight"><pre class="highlight"><code><span class="c"># (2024-03-19 수정)</span>
<span class="k">if </span><span class="nb">test</span> <span class="nt">-e</span> <span class="s2">"</span><span class="si">$(</span><span class="nb">readlink</span> <span class="nt">-f</span> <span class="nv">$HOME</span>/.ssh/ssh_auth_sock<span class="si">)</span><span class="s2">"</span> <span class="p">;</span> <span class="k">then
    </span><span class="nb">export </span><span class="nv">SSH_AUTH_SOCK</span><span class="o">=</span><span class="s2">"</span><span class="nv">$HOME</span><span class="s2">/.ssh/ssh_auth_sock"</span>
<span class="k">elif</span> <span class="o">!</span> <span class="nb">test</span> <span class="s2">"</span><span class="nv">$SSH_AUTH_SOCK</span><span class="s2">"</span> <span class="p">;</span> <span class="k">then
    </span><span class="nb">export </span><span class="nv">SSH_AUTH_SOCK</span><span class="o">=</span><span class="s2">"</span><span class="k">${</span><span class="nv">XDG_RUNTIME_DIR</span><span class="k">}</span><span class="s2">/ssh-agent.socket"</span>
<span class="k">fi</span>
</code></pre></div></div>

<h2 id="reference-1">Reference</h2>

<ul>
  <li>https://blog.testdouble.com/posts/2016-11-18-reconciling-tmux-and-ssh-agent-forwarding/</li>
  <li>https://blog.sanctum.geek.nz/reloading-tmux-config/</li>
</ul>]]></content><author><name>Changmin Choi</name><email>cmchoi9901@gmail.com</email></author><category term="git" /><category term="github" /><category term="linux" /><category term="debugging" /><category term="tmux" /><summary type="html"><![CDATA[트러블슈팅 깃헙에 푸시를 하는 등의 작업을 할 때 ssh key인증을 해야 합니다. 하지만 서버에서 주로 작업하는 경우 이러한 인증에 어려움이 있을 수 있고 어쩔 수 없이 서버에 key를 두고 작업하는 경우도 있습니다. 하지만 key는 공용 서버라면 서버에 두지 않는 편이 좋고 ssh-agent forwarding이라는 것을 사용하면 로컬에 있는 ssh key를 서버에서도 사용할 수 있습니다. 깃헙에서 이를 설명한 자세한 글이 이 링크에 있습니다. 이 글에서도 트러블 슈팅 방법에 대해서 설명하고 있지만 간략하게 정리해보려고 합니다. 조심해야할 점은, 말 그대로 로컬의 ssh-agent를 forwarding하는 것이기에, forwarding 이후에 ssh-agent를 다시 실행하면 안됩니다. 다시 실행한다면 기존의 ssh-agent를 가르키고 있던 $SSH_AUTH_SOCK을 덮어 써버려서 의미가 없어집니다. 이러한 일은 특히 multiple hop ssh agent forwaridng에서 쉽게 일어날 수 있는데, shell rc 에 ssh-agent를 실행하게 한 경우 특히 자주 일어납니다. 이를 막기위해서는 $SSH_AUTH_SOCK이 Set되어 있는 지 확인하고, Set 되어 있지 않으면 ssh-agent를 실행하는 방식으로 해결할 수 있습니다. 과정 기본적으로 로컬과 서버 모두 ssh-agent가 켜져 있는 지 확인해야 합니다 echo $SSH_AUTH_SOCK 에서 출력이 되는 지 아닌 지로 확인할 수 있습니다. 로컬에 ssh-add -L을 했을 때 공개키가 출력되어야 합니다. 만약 출력되지 않는다면 ssh-add를 입력하여 ~/.ssh아래에 있는 키들을 자동으로 ssh-agent에 등록하거나 ssh-add -K path/to/private_key를 하여 다른 위치에 있는 private key를 ssh-agent와 키체인에 등록할 수 있습니다. 마지막 과정으로 서버에서 ssh-add -L을 했을 때 마찬가지로 공개키가 출력되어야 합니다. 여기서 공개키가 출력되지 않는다면 어딘가에서 문제가 있었기 때문이므로 1,2번 과정을 체크해보거나 앞서 언급한 깃헙 링크에서 트러블슈팅 파트를 읽어 보시는 걸 추천합니다. ssh agent를 user-level systemd service로 만들기 트러블슈팅 글에서도 알 수 있듯이 ssh-agent가 항상 켜져있어야 문제 없이 ssh-agent-forwarding이 잘 작동합니다. 때문에 systemd를 사용할 수 있는 환경이라면 user-level systemd service를 활용하여 재부팅/세션종료 후 재접속 하더라도 ssh-agent가 항상 켜져있을 수 있도록 도와주게 할 수 있습니다. 과정 ~/.config/systemd/user/ssh-agent.service파일을 새로 만들면서 다음과 같이 설정합니다. [Unit] Description=SSH key agent [Service] Type=simple Environment=SSH_AUTH_SOCK=%t/ssh-agent.socket ExecStart=/usr/bin/ssh-agent -D -a $SSH_AUTH_SOCK [Install] WantedBy=default.target systemctl --user daemon-reload 를 실행합니다. systemctl --user enable --now ssh-agent를 실행합니다. 이렇게 하면 ${XDG_RUNTIME_DIR}/ssh-agent.socket위치에 file의 형태로 SSH_AUTH_SOCK이 저장됩니다. 앞서 말한대로 SSH Agent Overwrite 이슈를 피하기 위해서는, shell rc (.bashrc / .zshrc 등…) 에 다음을 추가해주는 것이 좋습니다. 이 코드는 SSH_AUTH_SOCK이 설정되어 있지 않을 때 위에서 작업한 SSH Agent의 SOCK을 바라보도록 하는 코드입니다. if ! test "$SSH_AUTH_SOCK" ; then export SSH_AUTH_SOCK="${XDG_RUNTIME_DIR}/ssh-agent.socket" fi Reference https://unix.stackexchange.com/a/390631 https://unix.stackexchange.com/questions/528360/ssh-agent-forwarding-troubleshooting#comment977659_528360 tmux에서 ssh agent forwarding 사용하기 tmux에서 ssh agent forwarding이 잘 안되는 이유는, tmux가 ssh 세션보다 오래 살아있어서 SSH_AUTH_SOCK 변수를 이미 죽은 ssh 세션의 것으로 들고 있기 때문입니다. 이를 해결하기 위해서는 SSH_AUTH_SOCK이 가르키고 있는 temp 파일을 홈 디렉토리에 symlink하고, tmux에서는 그 파일을 보게 만들면 됩니다. 과정 ~/.ssh/rc에 다음 코드를 추가해줍니다. # Fix SSH auth socket location so agent forwarding works with tmux if test "$SSH_AUTH_SOCK" ; then ln -sf $SSH_AUTH_SOCK ~/.ssh/ssh_auth_sock fi 그리고 위에서 shell rc에 추가한 코드를 수정하여 다음과 같이 바꿉니다. 이 코드는 ~/.ssh/ssh_auth_sock, SSH_AUTH_SOCK, XDG_RUNTIME_DIR 순서대로 값을 확인하고 SSH_AUTH_SOCK을 설정하는 코드입니다. # (2024-03-19 수정) if test -e "$(readlink -f $HOME/.ssh/ssh_auth_sock)" ; then export SSH_AUTH_SOCK="$HOME/.ssh/ssh_auth_sock" elif ! test "$SSH_AUTH_SOCK" ; then export SSH_AUTH_SOCK="${XDG_RUNTIME_DIR}/ssh-agent.socket" fi Reference https://blog.testdouble.com/posts/2016-11-18-reconciling-tmux-and-ssh-agent-forwarding/ https://blog.sanctum.geek.nz/reloading-tmux-config/]]></summary><media:thumbnail xmlns:media="http://search.yahoo.com/mrss/" url="http://torch.vision/assets/images/profile.png" /><media:content medium="image" url="http://torch.vision/assets/images/profile.png" xmlns:media="http://search.yahoo.com/mrss/" /></entry><entry><title type="html">Paper Review: Do Adversarially Robust ImageNet Models Transfer Better?</title><link href="http://torch.vision/posts/robust-ImageNet-model_transfer" rel="alternate" type="text/html" title="Paper Review: Do Adversarially Robust ImageNet Models Transfer Better?" /><published>2020-08-07T00:00:00+09:00</published><updated>2020-08-07T00:00:00+09:00</updated><id>http://torch.vision/posts/robust-ImageNet-model_transfer</id><content type="html" xml:base="http://torch.vision/posts/robust-ImageNet-model_transfer"><![CDATA[<p>Paper Link: <a href="https://arxiv.org/abs/2007.08489">https://arxiv.org/abs/2007.08489</a></p>

<h1 id="contribution">Contribution</h1>

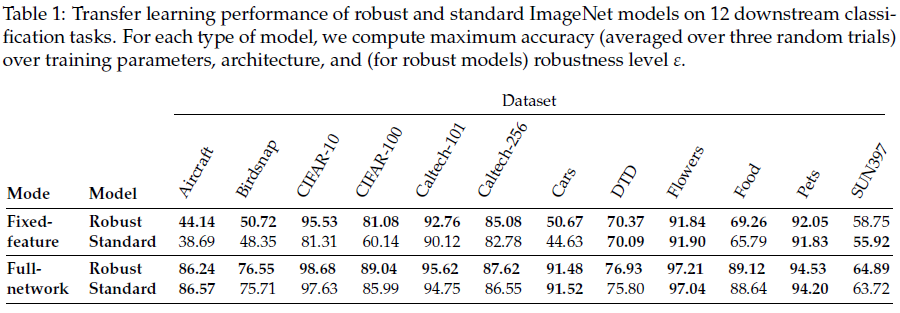
<p><img src="/assets/images/robust-ImageNet-model_transfer/table-1.png" alt="robust-ImageNet-model_transfer/table-1.png" /></p>

<p>Authors identified that adversarial robustness affects transfer learning performance.</p>

<p>Despite being less accurate on ImageNet, adversarially robust neural networks match or improve on the transfer performance of their standard counterparts.</p>

<p>They establish this trend in both “fixed-feature” setting in which one trains a linear classifier on top of feature extracted from a pre-trained network and “full-network” setting in which the pre-trained model is entirely fine-tuned on the relevant downstream task.</p>

<h1 id="motivation">Motivation</h1>

<h2 id="how-can-we-improve-transfer-learning">How can we improve transfer learning?</h2>

<p>Prior works suggest that accuracy on the source dataset is a strong indicator of performance on
downstream tasks.</p>

<p>Still, it is unclear if improving ImageNet accuracy is the only way to improve performance. After all, the behavior of fixed-feature transfer is governed by models’ learned representations, which are not fully described by source-dataset accuracy.</p>

<p>These representations are, in turn, controlled by the priors that we put on them during training.</p>

<h2 id="adversarial-robustness-prior">Adversarial robustness prior</h2>

<p>Adversarial robustness refers to a model’s invariance to small (often imperceptible) perturbations of its inputs.</p>

<p>Robustness is typically induced at training time by replacing the standard empirical risk minimization objective with a robust optimization objective:</p>

\[\min _{\theta} \mathbb{E}_{(x, y) \sim D}[\mathcal{L}(x, y ; \theta)] \Longrightarrow \min _{\theta} \mathbb{E}_{(x, y) \sim D}\left[\max _{\|\delta\|_{2} \leq \varepsilon} \mathcal{L}(x+\delta, y ; \theta)\right]\]

<p>where $\theta$ is the model parameters, $\mathcal{L}$ is loss function, and $(x, y) \sim D$ are training image-label pairs.</p>

<p>This objective rather than minimizing the loss on the training points, minimizing the worst-case loss over a ball around each training point instead.</p>

<h2 id="should-adversarial-robustness-help-fixed-feature-transfer">Should adversarial robustness help fixed-feature transfer?</h2>

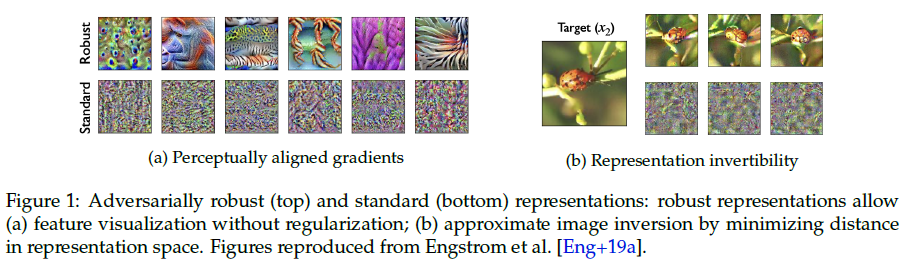
<p><img src="/assets/images/robust-ImageNet-model_transfer/figure-1.png" alt="robust-ImageNet-model_transfer/figure-1.png" /></p>

<p>On one hand, robustness to adversarial examples may seem somewhat tangential to transfer performance. In fact, adversarially robust models are known to be significantly less accurate than their standard counterparts, suggesting that using adversarially robust feature representations should hurt transfer performance.</p>

<p>On the other hand, recent work has found that the feature representations of robust models carry several advantages over those of standard models. For example, adversarially robust representations have better-behaved gradients and they are approximately invertible meaning that an image can be approximately reconstructed directly from its robust representation. Engstrom et al. hypothesize that the robust training objective leads to feature representations that are more similar to what humans use.</p>

<h1 id="adversarial-robustness-and-full-network-fine-tuning">Adversarial Robustness and Full-Network Fine Tuning</h1>

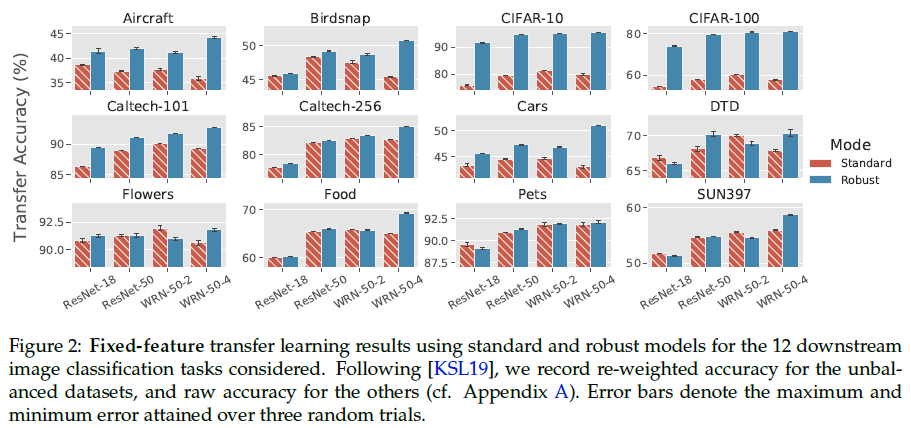
<p><img src="/assets/images/robust-ImageNet-model_transfer/figure-2.png" alt="robust-ImageNet-model_transfer/figure-2.png" /></p>

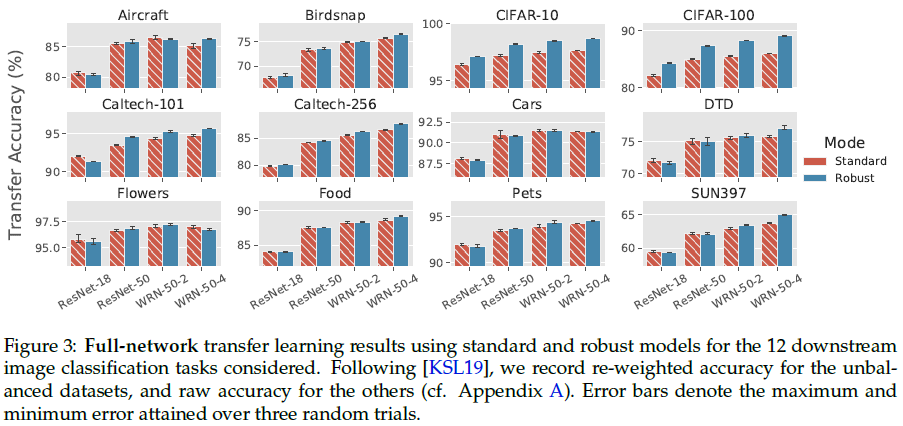
<p><img src="/assets/images/robust-ImageNet-model_transfer/figure-3.png" alt="robust-ImageNet-model_transfer/figure-3.png" /></p>

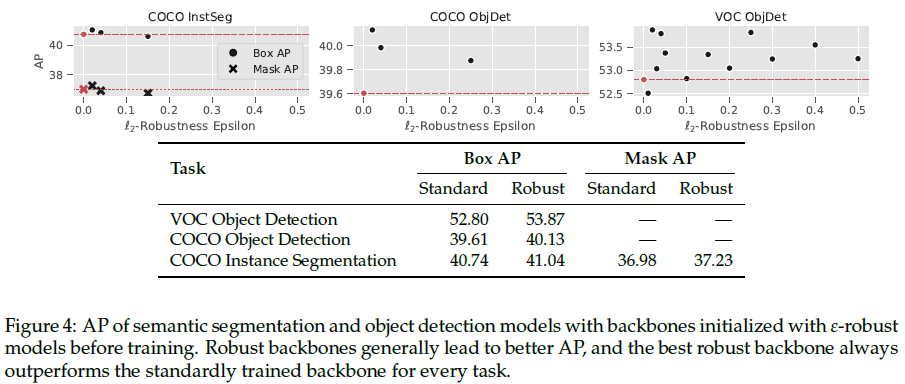
<p><img src="/assets/images/robust-ImageNet-model_transfer/figure-4.png" alt="robust-ImageNet-model_transfer/figure-4.png" /></p>

<p>Robust models match or improve on the transfer learning performance of standard ones.</p>

<h1 id="analysis-and-discussion">Analysis and Discussion</h1>

<p>In this section, we take a closer look at the similarities and differences in transfer learning between robust networks and standard networks.</p>

<h2 id="imagenet-accuracy-and-transfer-performance">ImageNet accuracy and transfer performance</h2>

<p>Authors hypothesize that robustness and accuracy have effects which is counteracting but separate. In other words, higher accuracy with fixed robustness and higher robustness with fixed accuracy both improve transfer learning.</p>

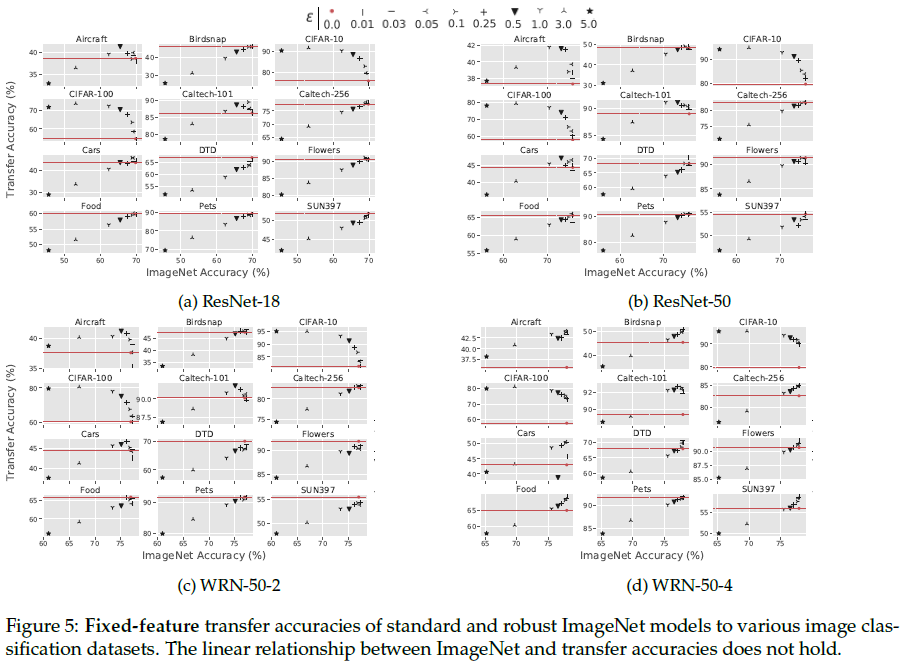
<p><img src="/assets/images/robust-ImageNet-model_transfer/figure-5.png" alt="robust-ImageNet-model_transfer/figure-5.png" /></p>

<p>To test this hypothesis, they first study the relationship between ImageNet accuracy and transfer accuracy for each of the robust models that they trained. They find that the previously observed linear relationship between accuracy and transfer performance is often violated once the robustness aspect comes into play. (figure 5)</p>

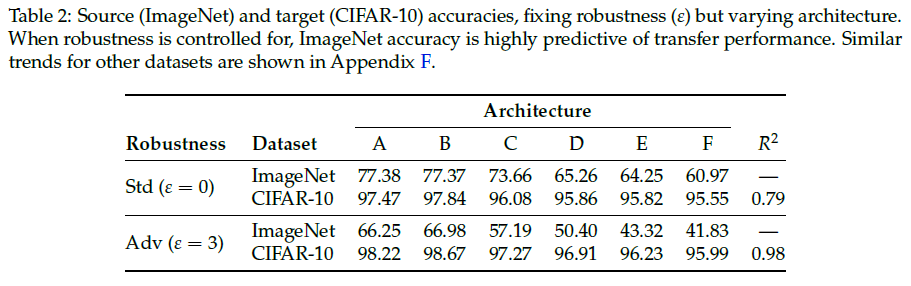
<p><img src="/assets/images/robust-ImageNet-model_transfer/table-2.png" alt="robust-ImageNet-model_transfer/table-2.png" /></p>

<p>Also, they find that when robustness level is held fixed, the accuracy-transfer correlation observed by prior works for standard models holds for robust models too. Table 2 shows that for these models improving ImageNet accuracy improves transfer performance at around the same rate as standard models.</p>

<p>⇒ Transfer learning performance can be further improved by applying known techniques that increase the accuracy of robust models. Accuracy is not sufficient for measuring feature quality or versatility. But we don’t know why robust networks transfer well for now.</p>

<h2 id="robust-models-improve-with-width">Robust models improve with width</h2>

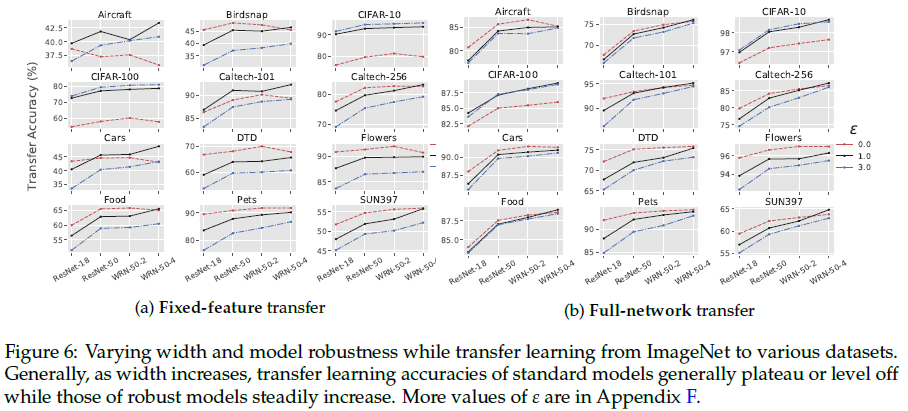
<p><img src="/assets/images/robust-ImageNet-model_transfer/figure-6.png" alt="robust-ImageNet-model_transfer/figure-6.png" /></p>

<h2 id="optimal-robustness-levels-for-downstream-tasks">Optimal robustness levels for downstream tasks</h2>

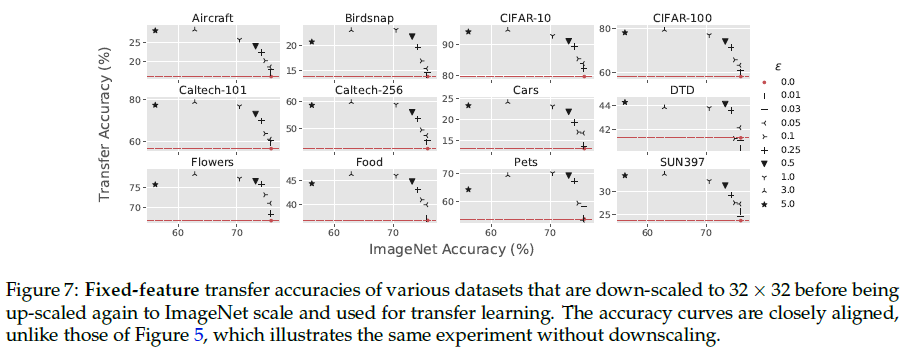
<p><img src="/assets/images/robust-ImageNet-model_transfer/figure-7.png" alt="robust-ImageNet-model_transfer/figure-7.png" /></p>

<p>Authors observe that although the best robust models often outperform the best standard models, the optimal choice of robustness parameter $\epsilon$ varies widely between datasets. They explain that this variability of optimal choice might relate to dataset granularity. They hypothesize that on datasets where leveraging finer-grained features are necessary, the most effective values of $\epsilon$ will be much smaller than for a dataset where leveraging more coarse-grained features suffices.</p>

<p>Although we lack a quantitative notion of granularity (in reality, features are not simply singular pixels), authors consider image resolution as a crude proxy. They attempt to calibrate the granularities of the 12 image classification datasets used in this work, by first downscaling all the images to the size of CIFAR-10 (32 x 32), and then upscaling them to ImageNet size once more. They then repeat the fixed-feature regression experiments from prior sections, plotting the results in Figure 7. After controlling for original dataset dimension, the datasets’ epsilon vs. transfer accuracy curves all behave almost identically to CIFAR-10 and CIFAR-100 ones.</p>

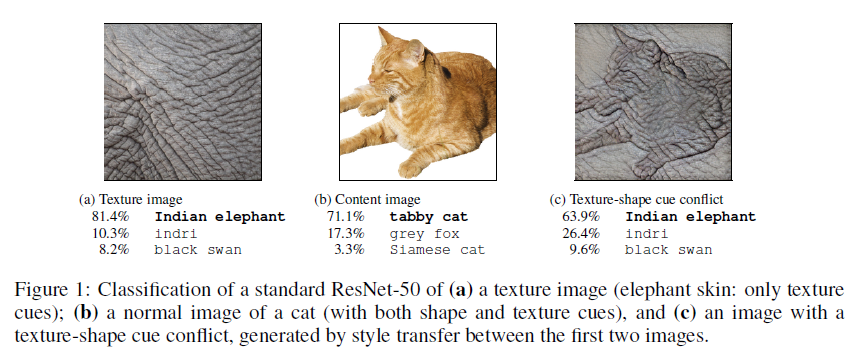
<h2 id="comparing-adversarial-robustness-to-texture-robustness">Comparing adversarial robustness to texture robustness</h2>

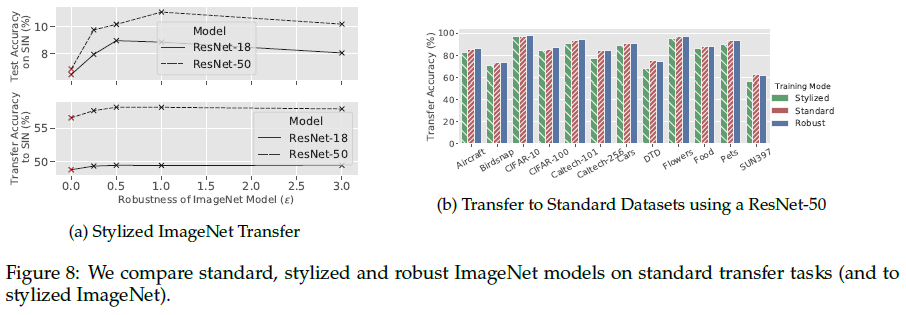
<p><img src="/assets/images/robust-ImageNet-model_transfer/figure-8.png" alt="robust-ImageNet-model_transfer/figure-8.png" /></p>

<p>Figure 8b shows that transfer learning from adversarially robust models outperforms transfer learning from texture-invariant models on all considered datasets.</p>

<p>Figure 8a top shows that robust models outperform standard imagenet models when evaluated (top) or fine-tuned (bottom) on Stylized-ImageNet.</p>]]></content><author><name>Changmin Choi</name><email>cmchoi9901@gmail.com</email></author><category term="paper" /><category term="review" /><category term="DeepLearning" /><category term="Vision" /><summary type="html"><![CDATA[Paper Link: https://arxiv.org/abs/2007.08489 Contribution Authors identified that adversarial robustness affects transfer learning performance. Despite being less accurate on ImageNet, adversarially robust neural networks match or improve on the transfer performance of their standard counterparts. They establish this trend in both “fixed-feature” setting in which one trains a linear classifier on top of feature extracted from a pre-trained network and “full-network” setting in which the pre-trained model is entirely fine-tuned on the relevant downstream task. Motivation How can we improve transfer learning? Prior works suggest that accuracy on the source dataset is a strong indicator of performance on downstream tasks. Still, it is unclear if improving ImageNet accuracy is the only way to improve performance. After all, the behavior of fixed-feature transfer is governed by models’ learned representations, which are not fully described by source-dataset accuracy. These representations are, in turn, controlled by the priors that we put on them during training. Adversarial robustness prior Adversarial robustness refers to a model’s invariance to small (often imperceptible) perturbations of its inputs. Robustness is typically induced at training time by replacing the standard empirical risk minimization objective with a robust optimization objective: \[\min _{\theta} \mathbb{E}_{(x, y) \sim D}[\mathcal{L}(x, y ; \theta)] \Longrightarrow \min _{\theta} \mathbb{E}_{(x, y) \sim D}\left[\max _{\|\delta\|_{2} \leq \varepsilon} \mathcal{L}(x+\delta, y ; \theta)\right]\] where $\theta$ is the model parameters, $\mathcal{L}$ is loss function, and $(x, y) \sim D$ are training image-label pairs. This objective rather than minimizing the loss on the training points, minimizing the worst-case loss over a ball around each training point instead. Should adversarial robustness help fixed-feature transfer? On one hand, robustness to adversarial examples may seem somewhat tangential to transfer performance. In fact, adversarially robust models are known to be significantly less accurate than their standard counterparts, suggesting that using adversarially robust feature representations should hurt transfer performance. On the other hand, recent work has found that the feature representations of robust models carry several advantages over those of standard models. For example, adversarially robust representations have better-behaved gradients and they are approximately invertible meaning that an image can be approximately reconstructed directly from its robust representation. Engstrom et al. hypothesize that the robust training objective leads to feature representations that are more similar to what humans use. Adversarial Robustness and Full-Network Fine Tuning Robust models match or improve on the transfer learning performance of standard ones. Analysis and Discussion In this section, we take a closer look at the similarities and differences in transfer learning between robust networks and standard networks. ImageNet accuracy and transfer performance Authors hypothesize that robustness and accuracy have effects which is counteracting but separate. In other words, higher accuracy with fixed robustness and higher robustness with fixed accuracy both improve transfer learning. To test this hypothesis, they first study the relationship between ImageNet accuracy and transfer accuracy for each of the robust models that they trained. They find that the previously observed linear relationship between accuracy and transfer performance is often violated once the robustness aspect comes into play. (figure 5) Also, they find that when robustness level is held fixed, the accuracy-transfer correlation observed by prior works for standard models holds for robust models too. Table 2 shows that for these models improving ImageNet accuracy improves transfer performance at around the same rate as standard models. ⇒ Transfer learning performance can be further improved by applying known techniques that increase the accuracy of robust models. Accuracy is not sufficient for measuring feature quality or versatility. But we don’t know why robust networks transfer well for now. Robust models improve with width Optimal robustness levels for downstream tasks Authors observe that although the best robust models often outperform the best standard models, the optimal choice of robustness parameter $\epsilon$ varies widely between datasets. They explain that this variability of optimal choice might relate to dataset granularity. They hypothesize that on datasets where leveraging finer-grained features are necessary, the most effective values of $\epsilon$ will be much smaller than for a dataset where leveraging more coarse-grained features suffices. Although we lack a quantitative notion of granularity (in reality, features are not simply singular pixels), authors consider image resolution as a crude proxy. They attempt to calibrate the granularities of the 12 image classification datasets used in this work, by first downscaling all the images to the size of CIFAR-10 (32 x 32), and then upscaling them to ImageNet size once more. They then repeat the fixed-feature regression experiments from prior sections, plotting the results in Figure 7. After controlling for original dataset dimension, the datasets’ epsilon vs. transfer accuracy curves all behave almost identically to CIFAR-10 and CIFAR-100 ones. Comparing adversarial robustness to texture robustness Figure 8b shows that transfer learning from adversarially robust models outperforms transfer learning from texture-invariant models on all considered datasets. Figure 8a top shows that robust models outperform standard imagenet models when evaluated (top) or fine-tuned (bottom) on Stylized-ImageNet.]]></summary><media:thumbnail xmlns:media="http://search.yahoo.com/mrss/" url="http://torch.vision/assets/images/profile.png" /><media:content medium="image" url="http://torch.vision/assets/images/profile.png" xmlns:media="http://search.yahoo.com/mrss/" /></entry><entry><title type="html">Awesome Python</title><link href="http://torch.vision/posts/Awesome_Python" rel="alternate" type="text/html" title="Awesome Python" /><published>2020-07-23T00:00:00+09:00</published><updated>2020-07-23T00:00:00+09:00</updated><id>http://torch.vision/posts/Awesome_Python</id><content type="html" xml:base="http://torch.vision/posts/Awesome_Python"><![CDATA[<h1 id="1-and-and-or-returns-the-object">1. “and” and “or” returns the object</h1>
<div class="language-python highlighter-rouge"><div class="highlight"><pre class="highlight"><code><span class="o">&gt;&gt;&gt;</span> <span class="p">[]</span> <span class="ow">and</span> <span class="p">{}</span>
<span class="p">[]</span> <span class="c1"># what???
</span></code></pre></div></div>

<p>Python’s “and” operation and “or” operation <strong>doesn’t returns “True” or “False”.</strong></p>

<div class="language-python highlighter-rouge"><div class="highlight"><pre class="highlight"><code><span class="n">A</span> <span class="ow">or</span> <span class="n">B</span> <span class="c1"># is equal to
</span><span class="n">A</span> <span class="k">if</span> <span class="n">A</span> <span class="ow">is</span> <span class="bp">True</span> <span class="k">else</span> <span class="n">B</span>
<span class="c1"># and also
</span><span class="n">A</span> <span class="ow">and</span> <span class="n">B</span> <span class="c1"># is equal to
</span><span class="n">A</span> <span class="k">if</span> <span class="n">A</span> <span class="ow">is</span> <span class="bp">False</span> <span class="k">else</span> <span class="n">B</span>
</code></pre></div></div>

<blockquote>
  <p>Note that neither and nor or restrict the value and type they return to <code class="language-plaintext highlighter-rouge">False</code> and <code class="language-plaintext highlighter-rouge">True</code>, but rather <strong>return the last evaluated argument</strong>.</p>
</blockquote>

<p>ref: <a href="https://docs.python.org/3/reference/expressions.html#boolean-operations">https://docs.python.org/3/reference/expressions.html#boolean-operations</a></p>

<h1 id="2-chaining-comparison-operators">2. Chaining comparison operators</h1>

<div class="language-python highlighter-rouge"><div class="highlight"><pre class="highlight"><code><span class="o">&gt;&gt;&gt;</span> <span class="k">def</span> <span class="nf">f</span><span class="p">(</span><span class="n">x</span><span class="p">):</span>
<span class="p">...</span>     <span class="k">print</span><span class="p">(</span><span class="n">x</span><span class="p">)</span>
<span class="p">...</span>     <span class="k">return</span> <span class="n">x</span>
<span class="p">...</span>
<span class="o">&gt;&gt;&gt;</span> <span class="mi">1</span> <span class="o">&gt;</span> <span class="n">f</span><span class="p">(</span><span class="mi">2</span><span class="p">)</span> <span class="o">&gt;</span> <span class="n">f</span><span class="p">(</span><span class="mi">3</span><span class="p">)</span>
<span class="mi">2</span>
<span class="bp">False</span>
<span class="o">&gt;&gt;&gt;</span> <span class="mi">1</span> <span class="o">&lt;</span> <span class="n">f</span><span class="p">(</span><span class="mi">2</span><span class="p">)</span> <span class="o">&lt;</span> <span class="n">f</span><span class="p">(</span><span class="mi">3</span><span class="p">)</span>
<span class="mi">2</span>
<span class="mi">3</span>
<span class="bp">True</span>
<span class="o">&gt;&gt;&gt;</span> <span class="mi">1</span> <span class="o">&gt;</span> <span class="n">f</span><span class="p">(</span><span class="mi">2</span><span class="p">)</span> <span class="ow">and</span> <span class="n">f</span><span class="p">(</span><span class="mi">2</span><span class="p">)</span> <span class="o">&gt;</span> <span class="n">f</span><span class="p">(</span><span class="mi">3</span><span class="p">)</span>
<span class="mi">2</span>
<span class="bp">False</span>
<span class="o">&gt;&gt;&gt;</span> <span class="mi">1</span> <span class="o">&lt;</span> <span class="n">f</span><span class="p">(</span><span class="mi">2</span><span class="p">)</span> <span class="ow">and</span> <span class="n">f</span><span class="p">(</span><span class="mi">2</span><span class="p">)</span> <span class="o">&lt;</span> <span class="n">f</span><span class="p">(</span><span class="mi">3</span><span class="p">)</span>
<span class="mi">2</span>
<span class="mi">3</span>
<span class="bp">True</span>
<span class="o">&gt;&gt;&gt;</span> <span class="n">a</span> <span class="o">=</span> <span class="mi">2</span>
<span class="o">&gt;&gt;&gt;</span> <span class="n">a</span> <span class="o">&gt;</span> <span class="mi">1</span> <span class="o">==</span> <span class="n">a</span> <span class="o">&gt;</span> <span class="mi">1</span>
<span class="bp">False</span>
<span class="o">&gt;&gt;&gt;</span> <span class="n">a</span> <span class="o">&lt;</span> <span class="mi">3</span> <span class="o">==</span> <span class="bp">True</span>
<span class="bp">False</span>
<span class="o">&gt;&gt;&gt;</span> <span class="mi">1</span> <span class="o">&lt;</span> <span class="mi">3</span> <span class="ow">is</span> <span class="bp">True</span>
<span class="bp">False</span>
</code></pre></div></div>

<blockquote>
  <p>Comparisons can be chained arbitrarily, e.g., <code class="language-plaintext highlighter-rouge">x &lt; y &lt;= z</code> is equivalent to <code class="language-plaintext highlighter-rouge">x &lt; y and y &lt;= z</code>, except that y is evaluated only once (but in both cases z is not evaluated at all when <code class="language-plaintext highlighter-rouge">x &lt; y</code> is found to be false).
Formally, if a, b, c, …, y, z are expressions and op1, op2, …, opN are comparison operators, then <code class="language-plaintext highlighter-rouge">a op1 b op2 c ... y opN z</code> is equivalent to <code class="language-plaintext highlighter-rouge">a op1 b and b op2 c and ... y opN z</code>, except that each expression is evaluated at most once.</p>
</blockquote>

<p>ref: <a href="https://docs.python.org/3/reference/expressions.html#comparisons">https://docs.python.org/3/reference/expressions.html#comparisons</a></p>]]></content><author><name>Changmin Choi</name><email>cmchoi9901@gmail.com</email></author><category term="Python" /><summary type="html"><![CDATA[1. “and” and “or” returns the object &gt;&gt;&gt; [] and {} [] # what??? Python’s “and” operation and “or” operation doesn’t returns “True” or “False”. A or B # is equal to A if A is True else B # and also A and B # is equal to A if A is False else B Note that neither and nor or restrict the value and type they return to False and True, but rather return the last evaluated argument. ref: https://docs.python.org/3/reference/expressions.html#boolean-operations 2. Chaining comparison operators &gt;&gt;&gt; def f(x): ... print(x) ... return x ... &gt;&gt;&gt; 1 &gt; f(2) &gt; f(3) 2 False &gt;&gt;&gt; 1 &lt; f(2) &lt; f(3) 2 3 True &gt;&gt;&gt; 1 &gt; f(2) and f(2) &gt; f(3) 2 False &gt;&gt;&gt; 1 &lt; f(2) and f(2) &lt; f(3) 2 2 3 True &gt;&gt;&gt; a = 2 &gt;&gt;&gt; a &gt; 1 == a &gt; 1 False &gt;&gt;&gt; a &lt; 3 == True False &gt;&gt;&gt; 1 &lt; 3 is True False Comparisons can be chained arbitrarily, e.g., x &lt; y &lt;= z is equivalent to x &lt; y and y &lt;= z, except that y is evaluated only once (but in both cases z is not evaluated at all when x &lt; y is found to be false). Formally, if a, b, c, …, y, z are expressions and op1, op2, …, opN are comparison operators, then a op1 b op2 c ... y opN z is equivalent to a op1 b and b op2 c and ... y opN z, except that each expression is evaluated at most once. ref: https://docs.python.org/3/reference/expressions.html#comparisons]]></summary><media:thumbnail xmlns:media="http://search.yahoo.com/mrss/" url="http://torch.vision/assets/images/profile.png" /><media:content medium="image" url="http://torch.vision/assets/images/profile.png" xmlns:media="http://search.yahoo.com/mrss/" /></entry><entry><title type="html">Entropy, Cross-Entropy, KL-Divergence</title><link href="http://torch.vision/posts/entropy_cross-entropy_KL-divergence" rel="alternate" type="text/html" title="Entropy, Cross-Entropy, KL-Divergence" /><published>2020-07-22T00:00:00+09:00</published><updated>2020-07-22T00:00:00+09:00</updated><id>http://torch.vision/posts/entropy_cross-entropy_KL-divergence</id><content type="html" xml:base="http://torch.vision/posts/entropy_cross-entropy_KL-divergence"><![CDATA[<h1 id="entropy-at-information-theory">Entropy (at Information theory)</h1>

<ul>
  <li>The <strong>expectation of bits</strong> that used for notating (or classify each other) <strong>probabilistic events</strong> when using optimal bits coding scheme. (\(log_2(\frac{1}{p})\) bits for notating events)</li>
  <li>Entropy also can be interpreted as the <strong>average rate</strong> at which <strong>information is produced</strong> (\(\text{I}(X) = log_2(\frac{1}{p})\)) by stochastic source of data. (rare events have more information than an often occurring event.)</li>
  <li>Entropy can be calculated by \(\text{H}(X) = \text{E}[\text{I}(X)] = \text{E}[-\text{log}_2 (\text{P}(X)] = \sum\limits_{p \in P} p \text{log}_2(\frac{1}{p}) = -\sum\limits_{p \in P} p \text{log}_2({p})\) where \(P\) is probability distribution. (Shannon’s source coding theorem)</li>
</ul>

<p>Let’s think about the situation that you need to notate characters “<strong>A</strong>, <strong>B</strong>, <strong>C</strong>, <strong>D</strong>” in bits that stochastically written in a sentence. You can simply notate each character with 2 bits. For example, “00” for <strong>A</strong>, “01” for <strong>B</strong>, “10” for <strong>C</strong>, “11” for D. If every character have the same probability, (\(\text{P}(A) = \text{P}(B) = \text{P}(C) = \text{P}(D) = 1/4\)) this notating is optimal notating. You used <strong>2 bits for each character on average.</strong> (2 * 1/4 * 4)</p>

<p>But how about \(\text{P}(A) = 1/2, \text{P}(B) = 1/4, \text{P}(C) = \text{P}(D) = 1/8\) ? If you use same scheme, you will use <strong>2 bits</strong> for each character on average. (2 * 1/2 + 2 * 1/4 + 2 * 1/8 * 2 = 2 * (1/2 + 1/4 + 1/8 + 1/8)) However, this is not optimal scheme for notating 4 character. As character <strong>A</strong> is frequently used than others, if you notate <strong>A</strong> with less bits, you can use less bits on average. So when notating “1” for <strong>A</strong>, “01” for <strong>B</strong>, “000” for <strong>C</strong>, “001” for <strong>D</strong>, <strong>1.75 bits are used on average</strong> (1 * 1/2 + 2 * 1/4 + 3 * 1/8 * 2 = 1.75). In that case, you can decode bits by following rules:</p>

<ol>
  <li>If looking bit is 1 or length of group of bits is 3, finish one character decoding.</li>
  <li>If looking bit is 0, add looking bit (0) to group of bits and looking next bit.</li>
</ol>

<h1 id="cross-entropy-and-kl-divergence">Cross-Entropy and KL-Divergence</h1>

<p>The <strong>cross-entropy</strong> of the distribution \(q\) relative to distribution \(p\) over a given set is defined as follows:</p>

\[\text{H}(p,q) = -\text{E}[l] = - \text{E}_p[\text{log}_2(q)] = - \sum_{x \in X} p(x) \text{log}_2(q(x)) = \text{H}(p) + D_{KL}(p \Vert q) \tag{1}\]

<p>You can think <strong>cross-entropy</strong> as applying coding scheme which is optimal to probability distribution \(q\) (\(l_i = - \text{log}_2(q(x_i)) \Leftrightarrow q(x_i) = (\frac{1}{2})^{l_i}\)) to probability distribution \(p\) where \(l_i\) is length of bits to coding i-th.</p>

<p><strong>Kullback–Leibler divergence (KL-Divergence)</strong> can be thought of as something like a measurement of how far the distribution \(q\) is from the distribution \(p\).</p>

\[D_{KL}(p \Vert q) = \sum_{x \in X} p(x)\text{log}(\frac{p(x)}{q(x)}) = - \sum_{x \in X}p(x)\text{log}q(x) - (- \sum_{x \in X}p(x)\text{log}p(x))\\
= \text{H}(p,q) - \text{H}(p)\]

<p>In deep learning, \(p\) is dataset and \(q\) is neural network output. Making cross-entropy loss smaller is making KL-Divergence of \(p\) and \(q\) ( \(D_{KL}(p \Vert q))\) ) smaller because \(\text{H}(p)\) is fixed value.</p>

<h1 id="reference">Reference</h1>

<ul>
  <li><a href="https://en.wikipedia.org/wiki/Entropy_(information_theory)">https://en.wikipedia.org/wiki/Entropy_(information_theory)</a></li>
  <li><a href="https://en.wikipedia.org/wiki/Cross_entropy">https://en.wikipedia.org/wiki/Cross_entropy</a></li>
  <li><a href="https://en.wikipedia.org/wiki/Kullback%E2%80%93Leibler_divergence">https://en.wikipedia.org/wiki/Kullback–Leibler_divergence</a></li>
</ul>]]></content><author><name>Changmin Choi</name><email>cmchoi9901@gmail.com</email></author><category term="DeepLearning" /><summary type="html"><![CDATA[Entropy (at Information theory) The expectation of bits that used for notating (or classify each other) probabilistic events when using optimal bits coding scheme. (\(log_2(\frac{1}{p})\) bits for notating events) Entropy also can be interpreted as the average rate at which information is produced (\(\text{I}(X) = log_2(\frac{1}{p})\)) by stochastic source of data. (rare events have more information than an often occurring event.) Entropy can be calculated by \(\text{H}(X) = \text{E}[\text{I}(X)] = \text{E}[-\text{log}_2 (\text{P}(X)] = \sum\limits_{p \in P} p \text{log}_2(\frac{1}{p}) = -\sum\limits_{p \in P} p \text{log}_2({p})\) where \(P\) is probability distribution. (Shannon’s source coding theorem) Let’s think about the situation that you need to notate characters “A, B, C, D” in bits that stochastically written in a sentence. You can simply notate each character with 2 bits. For example, “00” for A, “01” for B, “10” for C, “11” for D. If every character have the same probability, (\(\text{P}(A) = \text{P}(B) = \text{P}(C) = \text{P}(D) = 1/4\)) this notating is optimal notating. You used 2 bits for each character on average. (2 * 1/4 * 4) But how about \(\text{P}(A) = 1/2, \text{P}(B) = 1/4, \text{P}(C) = \text{P}(D) = 1/8\) ? If you use same scheme, you will use 2 bits for each character on average. (2 * 1/2 + 2 * 1/4 + 2 * 1/8 * 2 = 2 * (1/2 + 1/4 + 1/8 + 1/8)) However, this is not optimal scheme for notating 4 character. As character A is frequently used than others, if you notate A with less bits, you can use less bits on average. So when notating “1” for A, “01” for B, “000” for C, “001” for D, 1.75 bits are used on average (1 * 1/2 + 2 * 1/4 + 3 * 1/8 * 2 = 1.75). In that case, you can decode bits by following rules: If looking bit is 1 or length of group of bits is 3, finish one character decoding. If looking bit is 0, add looking bit (0) to group of bits and looking next bit. Cross-Entropy and KL-Divergence The cross-entropy of the distribution \(q\) relative to distribution \(p\) over a given set is defined as follows: \[\text{H}(p,q) = -\text{E}[l] = - \text{E}_p[\text{log}_2(q)] = - \sum_{x \in X} p(x) \text{log}_2(q(x)) = \text{H}(p) + D_{KL}(p \Vert q) \tag{1}\] You can think cross-entropy as applying coding scheme which is optimal to probability distribution \(q\) (\(l_i = - \text{log}_2(q(x_i)) \Leftrightarrow q(x_i) = (\frac{1}{2})^{l_i}\)) to probability distribution \(p\) where \(l_i\) is length of bits to coding i-th. Kullback–Leibler divergence (KL-Divergence) can be thought of as something like a measurement of how far the distribution \(q\) is from the distribution \(p\). \[D_{KL}(p \Vert q) = \sum_{x \in X} p(x)\text{log}(\frac{p(x)}{q(x)}) = - \sum_{x \in X}p(x)\text{log}q(x) - (- \sum_{x \in X}p(x)\text{log}p(x))\\ = \text{H}(p,q) - \text{H}(p)\] In deep learning, \(p\) is dataset and \(q\) is neural network output. Making cross-entropy loss smaller is making KL-Divergence of \(p\) and \(q\) ( \(D_{KL}(p \Vert q))\) ) smaller because \(\text{H}(p)\) is fixed value. Reference https://en.wikipedia.org/wiki/Entropy_(information_theory) https://en.wikipedia.org/wiki/Cross_entropy https://en.wikipedia.org/wiki/Kullback–Leibler_divergence]]></summary><media:thumbnail xmlns:media="http://search.yahoo.com/mrss/" url="http://torch.vision/assets/images/profile.png" /><media:content medium="image" url="http://torch.vision/assets/images/profile.png" xmlns:media="http://search.yahoo.com/mrss/" /></entry><entry><title type="html">What is Logit and Logistic?</title><link href="http://torch.vision/posts/what_is_logit_and_logistic" rel="alternate" type="text/html" title="What is Logit and Logistic?" /><published>2020-07-14T00:00:00+09:00</published><updated>2020-07-14T00:00:00+09:00</updated><id>http://torch.vision/posts/what_is_logit_and_logistic</id><content type="html" xml:base="http://torch.vision/posts/what_is_logit_and_logistic"><![CDATA[<h1 id="in-math">In Math</h1>

<p>If \(p\) is probability..</p>

<ul>
  <li><strong>odds</strong> is \(\frac{p}{1-p}\).</li>
  <li>The <strong>logit</strong> (<strong>log</strong>istic un<strong>it</strong>) function or the <strong>log-odds</strong> is \(logit(p) = \log \frac{p}{1-p}\) in statistics.
    <ul>
      <li>Logit function makes a map of probability values from \((0, 1)\) to \((-\infty, +\infty)\).</li>
    </ul>
  </li>
  <li>The <strong>logistic function</strong> or the <strong>sigmoid function</strong> is the inverse-logit. (\(logistic(x) = logit^{-1}(x) = \frac{1}{1+e^{-x}}=\frac{e^{x}}{e^{x}+1}=p\)</li>
</ul>

<h1 id="in-machine-learning">In Machine Learning</h1>

<p>The <strong>vector of raw (non-normalized) predictions</strong> that a classification model generates, which is ordinarily then passed to a normalization function. Normalization function could be the <strong>sigmoid function</strong> in binary-class classification or <strong>softmax function</strong> in multi-class classification.</p>

<h1 id="reference">Reference</h1>

<ul>
  <li><a href="https://stackoverflow.com/questions/41455101/what-is-the-meaning-of-the-word-logits-in-tensorflow">https://stackoverflow.com/questions/41455101/what-is-the-meaning-of-the-word-logits-in-tensorflow</a></li>
  <li><a href="https://en.wikipedia.org/wiki/Logit">https://en.wikipedia.org/wiki/Logit</a></li>
  <li><a href="https://en.wikipedia.org/wiki/Sigmoid_function">https://en.wikipedia.org/wiki/Sigmoid_function</a></li>
  <li><a href="https://en.wikipedia.org/wiki/Logistic_regression">https://en.wikipedia.org/wiki/Logistic_regression</a></li>
  <li><a href="https://developers.google.com/machine-learning/glossary/#logits">https://developers.google.com/machine-learning/glossary/#logits</a></li>
</ul>]]></content><author><name>Changmin Choi</name><email>cmchoi9901@gmail.com</email></author><category term="DeepLearning" /><summary type="html"><![CDATA[In Math If \(p\) is probability.. odds is \(\frac{p}{1-p}\). The logit (logistic unit) function or the log-odds is \(logit(p) = \log \frac{p}{1-p}\) in statistics. Logit function makes a map of probability values from \((0, 1)\) to \((-\infty, +\infty)\). The logistic function or the sigmoid function is the inverse-logit. (\(logistic(x) = logit^{-1}(x) = \frac{1}{1+e^{-x}}=\frac{e^{x}}{e^{x}+1}=p\) In Machine Learning The vector of raw (non-normalized) predictions that a classification model generates, which is ordinarily then passed to a normalization function. Normalization function could be the sigmoid function in binary-class classification or softmax function in multi-class classification. Reference https://stackoverflow.com/questions/41455101/what-is-the-meaning-of-the-word-logits-in-tensorflow https://en.wikipedia.org/wiki/Logit https://en.wikipedia.org/wiki/Sigmoid_function https://en.wikipedia.org/wiki/Logistic_regression https://developers.google.com/machine-learning/glossary/#logits]]></summary><media:thumbnail xmlns:media="http://search.yahoo.com/mrss/" url="http://torch.vision/assets/images/profile.png" /><media:content medium="image" url="http://torch.vision/assets/images/profile.png" xmlns:media="http://search.yahoo.com/mrss/" /></entry><entry><title type="html">CVPR 2020 Tutorial: Interpretable Machine Learning for Computer Vision</title><link href="http://torch.vision/posts/CVPR20-tuto_Interpretable_Machine_Learning" rel="alternate" type="text/html" title="CVPR 2020 Tutorial: Interpretable Machine Learning for Computer Vision" /><published>2020-06-17T00:00:00+09:00</published><updated>2020-06-17T00:00:00+09:00</updated><id>http://torch.vision/posts/CVPR20-tuto_Interpretable_Machine_Learning</id><content type="html" xml:base="http://torch.vision/posts/CVPR20-tuto_Interpretable_Machine_Learning"><![CDATA[<p>website: <a href="https://interpretablevision.github.io/">https://interpretablevision.github.io/</a></p>

<p>Lecture 1 by <em>Bolei Zhou</em>: <strong>Exploring and Exploiting Interpretable Semantics in GANs.</strong> <a href="https://youtu.be/rfx3whKgFVo">video</a>, <a href="https://interpretablevision.github.io/slide/cvpr20_bolei.pdf">slide</a>, <a href="https://www.bilibili.com/video/BV1z54y1B785/">bili</a></p>

<p>Lecture 2 by <em>Zeynep Akata</em>: <strong>Modeling Conceptual Understanding in Image Reference Games</strong> <a href="https://youtu.be/-iI2tGc16fc">video</a>, <a href="https://interpretablevision.github.io/slide/cvpr20_zeynep.pdf">slide</a>, <a href="https://www.bilibili.com/video/BV1pZ4y1H7pM/">bili</a></p>

<p>Lecture 3 by <em>Ruth C. Fong</em>: <strong>Understanding Deep Neural Networks</strong> <a href="https://youtu.be/YrlWq0oFZ50">video</a>, <a href="https://interpretablevision.github.io/slide/cvpr20_ruth.pdf">slide</a>, <a href="https://www.bilibili.com/video/BV1tv41167xY/">bili</a></p>

<p>Lecture 4 by <em>Christopher Olah</em>: <strong>Introduction to Circuits in CNNs.</strong> <a href="https://youtu.be/gXsKyZ_Y_i8">video</a>, <a href="https://interpretablevision.github.io/slide/cvpr20_chris.pdf">slide</a>, <a href="https://www.bilibili.com/video/BV1ti4y1x7Pt/">bili</a></p>

<h1 id="lecture-1">Lecture 1</h1>

<p><img src="/assets/images/CVPR20-tuto_Interpretable_Machine_Learning/figure-0.png" alt="CVPR20-tuto_Interpretable_Machine_Learning/figure-0.png" /></p>

<ul>
  <li>turn on / off latent unit (GAN Dissection)</li>
  <li>random walk in latent space ← using attribute classifier in latent space (InterFaceGAN &amp; GAN Hierarchy)</li>
  <li>layer-wise stochastic vector</li>
</ul>

<p>→ <strong>control semantic</strong> / these using pre-trained classifier (supervised)</p>

<p>some unsupervised ways… (I can’t understand)</p>

<p><strong>GAN inverse</strong></p>

<p>want to generate image (encode latent vector) of unseen image domain</p>

<p><img src="/assets/images/CVPR20-tuto_Interpretable_Machine_Learning/figure-1.png" alt="CVPR20-tuto_Interpretable_Machine_Learning/figure-1.png" /></p>

<p>→ not works well with unseen image domain(asian, not face, etc.) (there is no constraint of encoded latent vector should in original latent domain)</p>

<p><img src="/assets/images/CVPR20-tuto_Interpretable_Machine_Learning/figure-2.png" alt="CVPR20-tuto_Interpretable_Machine_Learning/figure-2.png" /></p>

<p><img src="/assets/images/CVPR20-tuto_Interpretable_Machine_Learning/figure-3.png" alt="CVPR20-tuto_Interpretable_Machine_Learning/figure-3.png" /></p>

<h1 id="lecture-3">Lecture 3</h1>

<p><strong>Interpretability</strong> tools are <strong>crucial</strong> for high-impact, high-risk applications of deep learning.</p>

<p>supervised deep learning: <strong>Inputs</strong> (What is model looking at) + <strong>Internal Representation</strong> (What &amp; how does model encode) + <strong>Training Procedure</strong> (How can we improve model)</p>

<h2 id="what-is-model-looking-at">What is model looking at</h2>

<p>we want model not to cheat. we want model to get intuition from dataset.</p>

<p>→ but datasets have bias. classifier could not have intuition and just cheating the dataset.</p>

<h3 id="attribution-identify-input-features-responsible-for-model-decision">Attribution: identify input features responsible for model decision</h3>

<ul>
  <li>Prior work:
    <ol>
      <li>combine network activation and gradients ← fast but difficult to interpret</li>
      <li>Pertubation Approaches: change input and observe the effect on the output ← Clear meaning, but can only test small range of occlusions</li>
    </ol>
  </li>
  <li>Desired Approach: automated test and wide range of occlusions
    <ol>
      <li>Meaningful Perturbations: Learn a <strong>minimal</strong> mask <strong>m</strong> to perturb input <strong>x</strong> that maximally affects the networks output ← considers a wide range of occlusion sizes and shapes</li>
      <li>Extremal Perturbations: Learn a <strong>fixed-sized</strong> mask <strong>m</strong> to perturb input <strong>x</strong> that maximally <strong>preserves</strong> the network’s output</li>
    </ol>
  </li>
</ul>

<p>→ Foreground evidence is usually sufficient / Large objects are recognized by their details / multiple objects contribute cumulatively / suppressing the background may overdrive the network</p>

<p><strong>Adversarial Defense</strong></p>

<p><img src="/assets/images/CVPR20-tuto_Interpretable_Machine_Learning/figure-4.png" alt="CVPR20-tuto_Interpretable_Machine_Learning/figure-4.png" /></p>

<p>right graph: networks that are trained to get input as heatmap and to predict whether heatmap is from clean image or adversarial image can discover properly and even can recover origin label.</p>

<p>See the video for the details</p>

<p>→ Adversarial Defense is possible using heatmap!</p>

<p>⇒ How to use?</p>

<ol>
  <li>Research Development: Critically design and evaluate attribution methods</li>
  <li>General Usage: Assume a model has failures and use attribution methods to understand them</li>
</ol>

<h2 id="internal-representation">Internal Representation</h2>

<p><strong>Two main way to view intermediate activations</strong></p>

<p><img src="/assets/images/CVPR20-tuto_Interpretable_Machine_Learning/figure-5.png" alt="CVPR20-tuto_Interpretable_Machine_Learning/figure-5.png" /></p>

<p><strong>How groups of channels work together to encode?</strong> ← this is similar to how neuroscientist often don’t just study a single neuron in the brain for other coronated collections or populations of neurons</p>

<h3 id="attributing-channels-in-intermediate-activations">Attributing channels in intermediate activations</h3>

<p>What groups of channels are responsible for model’s decision?</p>

<h3 id="understanding-how-semantic-concepts-are-encoded">Understanding how semantic concepts are encoded</h3>

<p><img src="/assets/images/CVPR20-tuto_Interpretable_Machine_Learning/figure-6.png" alt="CVPR20-tuto_Interpretable_Machine_Learning/figure-6.png" /></p>

<p>one filter might be packed with multiple concepts and one concept might be encoded using multiple fillter</p>

<h1 id="lecture-4">Lecture 4</h1>

<p>reverse engineering NN! ← only small fraction of interpretable NN targets for</p>

<p><strong>What is understanding NN?</strong></p>

<p>→ Chris think understanding of NN is kind of understanding the variable or registers in a computer program when reverse engineering it.</p>

<p>The <strong>weights</strong> are the actual “<strong>assembly code</strong>” of our model!</p>

<p><strong>Reverse engineer a NN in two steps!</strong></p>

<ol>
  <li>Correctly understand all the neurons.</li>
  <li>Understand the weights connecting them.</li>
</ol>

<h2 id="understanding-neurons">Understanding Neurons</h2>

<h3 id="feature-visualization-activation-maximization"><strong>Feature Visualization (=activation maximization)</strong></h3>

<ul>
  <li>starting from random noise, make features that stimulate neuron by gradient descent.</li>
  <li><a href="https://distill.pub/2017/feature-visualization/">https://distill.pub/2017/feature-visualization/</a></li>
</ul>

<h3 id="interrogate-neurons">interrogate neurons</h3>

<p><img src="/assets/images/CVPR20-tuto_Interpretable_Machine_Learning/figure-7.png" alt="CVPR20-tuto_Interpretable_Machine_Learning/figure-7.png" /></p>

<h2 id="how-do-we-go-from-understanding-features-to-understanding-weights">How do we go from understanding features to understanding weights?</h2>

<p>Neurons are combine together and make new detector</p>

<p><img src="/assets/images/CVPR20-tuto_Interpretable_Machine_Learning/figure-8.png" alt="CVPR20-tuto_Interpretable_Machine_Learning/figure-8.png" /></p>

<h2 id="how-do-we-know-we-arent-fooling-ourselves">How do we know we aren’t fooling ourselves?</h2>

<h3 id="edit-circuits-to-change-model-behavior">Edit circuits to change model behavior</h3>

<p><img src="/assets/images/CVPR20-tuto_Interpretable_Machine_Learning/figure-9.png" alt="CVPR20-tuto_Interpretable_Machine_Learning/figure-9.png" /></p>

<h3 id="clean-room-reimplementation-of-hundreds-of-neurons">Clean room reimplementation of hundreds of neurons</h3>
<p>over five layers, building up to curve detectors.</p>

<p>(Wrote a small python program that filled in the weights of a neural network)</p>

<p><img src="/assets/images/CVPR20-tuto_Interpretable_Machine_Learning/figure-10.png" alt="CVPR20-tuto_Interpretable_Machine_Learning/figure-10.png" /></p>]]></content><author><name>Changmin Choi</name><email>cmchoi9901@gmail.com</email></author><category term="DeepLearning" /><category term="Vision" /><category term="CVPR" /><category term="Conference" /><summary type="html"><![CDATA[website: https://interpretablevision.github.io/ Lecture 1 by Bolei Zhou: Exploring and Exploiting Interpretable Semantics in GANs. video, slide, bili Lecture 2 by Zeynep Akata: Modeling Conceptual Understanding in Image Reference Games video, slide, bili Lecture 3 by Ruth C. Fong: Understanding Deep Neural Networks video, slide, bili Lecture 4 by Christopher Olah: Introduction to Circuits in CNNs. video, slide, bili Lecture 1 turn on / off latent unit (GAN Dissection) random walk in latent space ← using attribute classifier in latent space (InterFaceGAN &amp; GAN Hierarchy) layer-wise stochastic vector → control semantic / these using pre-trained classifier (supervised) some unsupervised ways… (I can’t understand) GAN inverse want to generate image (encode latent vector) of unseen image domain → not works well with unseen image domain(asian, not face, etc.) (there is no constraint of encoded latent vector should in original latent domain) Lecture 3 Interpretability tools are crucial for high-impact, high-risk applications of deep learning. supervised deep learning: Inputs (What is model looking at) + Internal Representation (What &amp; how does model encode) + Training Procedure (How can we improve model) What is model looking at we want model not to cheat. we want model to get intuition from dataset. → but datasets have bias. classifier could not have intuition and just cheating the dataset. Attribution: identify input features responsible for model decision Prior work: combine network activation and gradients ← fast but difficult to interpret Pertubation Approaches: change input and observe the effect on the output ← Clear meaning, but can only test small range of occlusions Desired Approach: automated test and wide range of occlusions Meaningful Perturbations: Learn a minimal mask m to perturb input x that maximally affects the networks output ← considers a wide range of occlusion sizes and shapes Extremal Perturbations: Learn a fixed-sized mask m to perturb input x that maximally preserves the network’s output → Foreground evidence is usually sufficient / Large objects are recognized by their details / multiple objects contribute cumulatively / suppressing the background may overdrive the network Adversarial Defense right graph: networks that are trained to get input as heatmap and to predict whether heatmap is from clean image or adversarial image can discover properly and even can recover origin label. See the video for the details → Adversarial Defense is possible using heatmap! ⇒ How to use? Research Development: Critically design and evaluate attribution methods General Usage: Assume a model has failures and use attribution methods to understand them Internal Representation Two main way to view intermediate activations How groups of channels work together to encode? ← this is similar to how neuroscientist often don’t just study a single neuron in the brain for other coronated collections or populations of neurons Attributing channels in intermediate activations What groups of channels are responsible for model’s decision? Understanding how semantic concepts are encoded one filter might be packed with multiple concepts and one concept might be encoded using multiple fillter Lecture 4 reverse engineering NN! ← only small fraction of interpretable NN targets for What is understanding NN? → Chris think understanding of NN is kind of understanding the variable or registers in a computer program when reverse engineering it. The weights are the actual “assembly code” of our model! Reverse engineer a NN in two steps! Correctly understand all the neurons. Understand the weights connecting them. Understanding Neurons Feature Visualization (=activation maximization) starting from random noise, make features that stimulate neuron by gradient descent. https://distill.pub/2017/feature-visualization/ interrogate neurons How do we go from understanding features to understanding weights? Neurons are combine together and make new detector How do we know we aren’t fooling ourselves? Edit circuits to change model behavior Clean room reimplementation of hundreds of neurons over five layers, building up to curve detectors. (Wrote a small python program that filled in the weights of a neural network)]]></summary><media:thumbnail xmlns:media="http://search.yahoo.com/mrss/" url="http://torch.vision/assets/images/profile.png" /><media:content medium="image" url="http://torch.vision/assets/images/profile.png" xmlns:media="http://search.yahoo.com/mrss/" /></entry></feed>